用js實現放大鏡效果
本文實例為大家分享了js實現放大鏡效果的具體代碼,供大家參考,具體內容如下
該放大區域用背景圖片放大
<!DOCTYPE html><html lang='zh'> <head> <meta charset='UTF-8'> <meta name='viewport' content='width=device-width, initial-scale=1.0'> <meta http-equiv='X-UA-Compatible' content='ie=edge'> <title></title> <style type='text/css'> body { height: 1200px; background-color: lightskyblue; } ul { margin: 0; padding: 0; list-style: none; } .itemarea { position: relative; width: 500px; height: 680px; border: 1px black solid; margin: 50px auto; } .itemarea .pic { margin-bottom: 15px; } .itemarea img { width: 500px; height: 600px; } .itemarea .pic .cover { position: absolute; left: 0; top: 0; width: 200px; height: 200px; background-image: url(img/7.png); opacity: 0.6; display: none; } .itemarea .list { display: flex; } .itemarea .list li { margin: auto; } .itemarea .list img { display: block; width: 50px; height: 50px; } .itemarea .detail { position: absolute; top: 0; left: 500px; /* 此處為放大2倍,顯示框的大小是遮陰框寬高的2倍 */ width: 400px; height: 400px; display: none; border: 1px black solid; background: url(img/1.PNG); /* 此處放大2倍,背景圖片的寬高是左邊顯示圖片的2倍 */ background-size: 1000px 1200px; /* background-size: 200%; 或者這樣寫*/ } .itemarea .list .current { border: 2px green solid; } </style> </head> <body> <div class='itemarea'> <div class='pic'> <img src='http://www.cgvv.com.cn/bcjs/img/1.PNG'> <div class='cover'></div> </div> <ul class='list'> <li><img src='http://www.cgvv.com.cn/bcjs/img/1.PNG'></li> <li><img src='http://www.cgvv.com.cn/bcjs/img/2.PNG'></li> <li><img src='http://www.cgvv.com.cn/bcjs/img/3.PNG'></li> <li><img src='http://www.cgvv.com.cn/bcjs/img/4.PNG'></li> <li><img src='http://www.cgvv.com.cn/bcjs/img/5.PNG'></li> <li><img src='http://www.cgvv.com.cn/bcjs/img/6.PNG'></li> </ul> <div class='detail'> </div> </div> <script type='text/javascript'> /* 需求 1,鼠標放入圖片時候,會動態修改圖片地址 2,鼠標放入大圖,會動態修改右邊圖片位置 2.1顯示圖片的放大鏡, 2.2顯示右邊效果 */ var itemarea = document.querySelector('.itemarea'); var list = document.querySelector('.list'); /* 上面的大圖片 */ img = document.querySelector('.pic img'); /* 所有的圖片 */ imgs = list.querySelectorAll('img'); /* 主圖片展示區域 */ pic = document.querySelector('.itemarea .pic'); /* 放大鏡 */ cover = document.querySelector('.cover'); /* 放大的區域 */ detail = document.querySelector('.detail'); /* 監聽事件,切換圖片src */ list.addEventListener('mousemove', function(e) { if (e.target.tagName == 'IMG') { img.src = e.target.src; detail.style.backgroundImage = 'url(' + e.target.src + ')'; /* 遍歷 所有邊框都為空*/ imgs.forEach(function(item) { item.className = ''; }) /* 選中的改變邊框顏色*/ e.target.className = 'current'; } }) pic.addEventListener('mousemove', function(e) { /* 放大鏡距離瀏覽器的距離 */ var x = e.clientX; y = e.clientY; /* 圖片框距離瀏覽器的距離 */ cx = pic.getBoundingClientRect().left; cy = pic.getBoundingClientRect().top; tx = x - cx - 100; ty = y - cy - 100; if (tx < 0) { tx = 0; } if (ty < 0) { ty = 0; } /* 顯示圖片寬-遮陰框的寬 */ if (tx >300) { tx = 300; } /* 顯示圖片高-遮陰框的高 */ if (ty > 400) { ty = 400; } cover.style.left = tx + 'px'; cover.style.top = ty + 'px'; /* 根據遮陰框在盒子的移動距離百分比------對應放映框在大圖片的移動距離百分比 */ /* tx,ty/遮陰框的極限范圍 */ detail.style.backgroundPosition = tx / 300 * 100 + '%' + ty / 400 * 100 + '%'; }) /* 移除隱藏 */ itemarea.onmouseout = function() { cover.style.display = 'none'; detail.style.display = 'none' } itemarea.onmouseover = function() { cover.style.display = 'block'; detail.style.display = 'block'; } </script> </body></html>
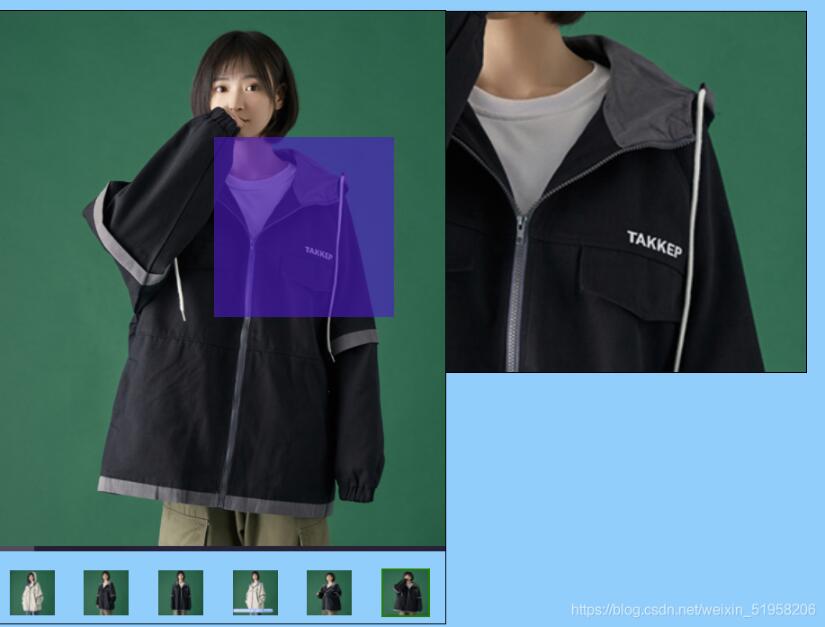
效果如下:

以上就是本文的全部內容,希望對大家的學習有所幫助,也希望大家多多支持好吧啦網。
相關文章:

 網公網安備
網公網安備