JavaScript前端實現壓縮圖片功能
為什么要前端來壓縮圖片
最近在做一個移動端h5上傳圖片的功能,本來這個功能并不復雜,只需要將圖片文件通過axios傳到服務端即可,但是考慮到現在手機設配的拍照功能十分強大,隨便一張照片都能動輒五六兆,而服務端的要求是上傳圖片必須小于兩兆,而且直接傳這么大圖片,帶寬它也受不了,所以前端進行壓縮圖片就成了一個必要的環節。
壓縮效果
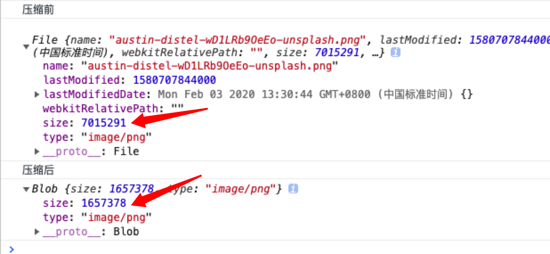
首先介紹下壓縮的大概流程
通過原生的input標簽拿到要上傳的圖片文件 將圖片文件轉化成img元素標簽 在canvas上壓縮繪制該HTMLImageElement 將canvas繪制的圖像轉成blob文件 最后將該blob文件傳到服務端 完成!接下來看下詳細步驟
考慮到文章和步驟的完整性,所以我會把每個細節都寫出來,即使有些東西很基礎。
1. 使用Input標簽來獲取圖片文件資源
這一步大家應該最熟悉不過了吧,原生input標簽,通過設置 type 屬性為file來讓用戶可以選擇文件,設置 accept 限制選擇的文件類型,綁定onchange事件,來獲取確認選擇后的文件
<input type='file' accept='image/*' />
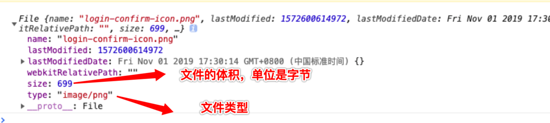
點擊控件,觸發焦點,打開文件資源管理器,選中文件并確認后,會觸發change事件,所以可以在change事件的回調中獲取選中文件,它長這個樣
2. 讀取文件轉成img標簽元素
拿到圖片文件后,先將其轉成HTMLImageElement,也就是普通的img標簽,具體要使用 FileReader構造函數。
先new出來一個img和fileReader的實例,通過fileReader的 readAsDataURL這個api,來讀取圖片文件,其返回值是一個編碼后的base64的字符串,然后將這個字符串賦值給img的src屬性上,這樣就完成了圖片文件到 HTMLImageElement的轉化。
// 先new一個img和fileReader的實例const img = new Image()const reader = new FileReader()// 讀取文件資源reader.readAsDataURL(file) reader.onload = function(e){ img.src = e.target.result}
轉化的HTMLImageElement

3. canvas壓縮,核心步驟
拿到轉化后的img元素后,先取出該元素的寬高度,這個寬高度就是實際圖片文件的寬高度。
const { width: originWidth, height: originHeight } = img
然后定義一個最大限度的寬高度,如果超過這個限制寬高度,則進行等比例的縮放
// 最大尺寸限制 const maxWidth = 1000,maxHeihgt = 1000 // 需要壓縮的目標尺寸 let targetWidth = originWidth, targetHeight = originHeight // 等比例計算超過最大限制時縮放后的圖片尺寸 if (originWidth > maxWidth || originHeight > maxHeight) { if (originWidth / originHeight > 1) { // 寬圖片 targetWidth = maxWidth targetHeight = Math.round(maxWidth * (originHeight / originWidth)) } else { // 高圖片 targetHeight = maxHeight targetWidth = Math.round(maxHeight * (originWidth / originHeight)) } }
計算好將要壓縮的尺寸后,創建canvas實例,設置canvas的寬高度為壓縮計算后的尺寸,并將img繪制到上面
// 創建畫布const canvas = document.createElement(’canvas’)const context = canvas.getContext(’2d’)// 設置寬高度為等同于要壓縮圖片的尺寸 canvas.width = targetWidth canvas.height = targetHeight context.clearRect(0, 0, targetWidth, targetHeight) //將img繪制到畫布上 context.drawImage(img, 0, 0, targetWidth, targetHeight)
4. 轉成blob文件
canvas繪制完成后,就可以使用 toBlob來將圖像轉成blob文件了,這個api接受三個入參
canvas.toBlob(callback, type, encoderOptions);
回調函數中可以得到轉化后的blob文件,type為要轉成的圖片類型,默認png。
encoderOptions為當設置的圖片格式為 image/jpeg 或者 image/webp 時用來指定圖片展示質量。
所以如果我們只是要壓縮jpg或者webp格式的圖片的話,不需要進行第3部的操作,直接使用這個api,然后填入想要的質量參數就可以了。但實際上,我們還是要考慮多種的圖片格式,因此很有必要使用第三部的過程。
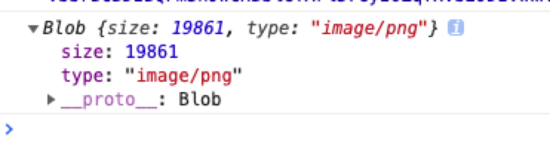
轉成的blob長這個樣子
5. 將blob上傳,大功告成。
完整的代碼實現
因為整個過程中都存在著異步回調操作,所以我使用了async,實現異步代碼的同步執行
// 壓縮前將file轉換成img對象function readImg(file) { return new Promise((resolve, reject) => { const img = new Image() const reader = new FileReader() reader.onload = function(e) { img.src = e.target.result } reader.onerror = function(e) { reject(e) } reader.readAsDataURL(file) img.onload = function() { resolve(img) } img.onerror = function(e) { reject(e) } })}
/** * 壓縮圖片 *@param img 被壓縮的img對象 * @param type 壓縮后轉換的文件類型 * @param mx 觸發壓縮的圖片最大寬度限制 * @param mh 觸發壓縮的圖片最大高度限制 */function compressImg(img, type, mx, mh) { return new Promise((resolve, reject) => { const canvas = document.createElement(’canvas’) const context = canvas.getContext(’2d’) const { width: originWidth, height: originHeight } = img // 最大尺寸限制 const maxWidth = mx const maxHeight = mh // 目標尺寸 let targetWidth = originWidth let targetHeight = originHeight if (originWidth > maxWidth || originHeight > maxHeight) { if (originWidth / originHeight > 1) { // 寬圖片 targetWidth = maxWidth targetHeight = Math.round(maxWidth * (originHeight / originWidth)) } else { // 高圖片 targetHeight = maxHeight targetWidth = Math.round(maxHeight * (originWidth / originHeight)) } } canvas.width = targetWidth canvas.height = targetHeight context.clearRect(0, 0, targetWidth, targetHeight) // 圖片繪制 context.drawImage(img, 0, 0, targetWidth, targetHeight) canvas.toBlob(function(blob) { resolve(blob) }, type || ’image/png’) })}
大致執行過程,具體可根據需求,自行改動
async function upload(file){ const img = await readImg(file) const blob = await compressImg(img, file.type, 1000, 1000) const formData = new FormData() formData.append(’file’, blob, ’xxx.jpg’) axios.post(’http://xxx.com/api’,formData)}upload(file).catch(e => console.log(e))
到此這篇關于JavaScript前端實現壓縮圖片功能的文章就介紹到這了,更多相關JavaScript 壓縮圖片內容請搜索好吧啦網以前的文章或繼續瀏覽下面的相關文章希望大家以后多多支持好吧啦網!
相關文章:

 網公網安備
網公網安備