Spring Boot2發布調用REST服務實現方法
開發環境:IntelliJ IDEA 2019.2.2Spring Boot版本:2.1.8
一、發布REST服務
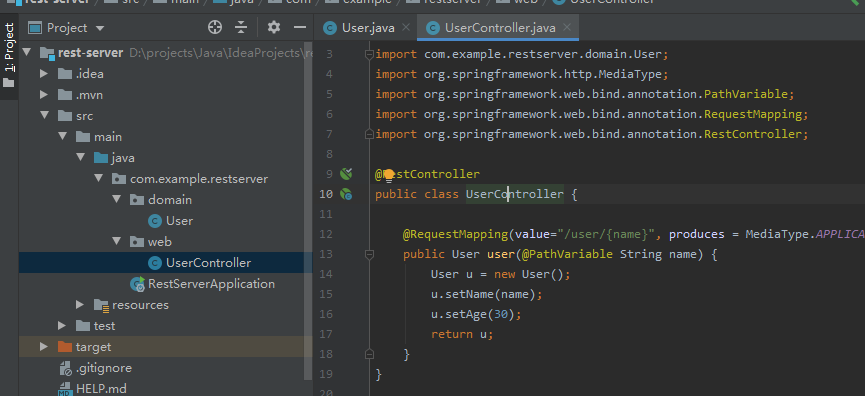
1、IDEA新建一個名稱為rest-server的Spring Boot項目
2、新建一個實體類User.java
package com.example.restserver.domain;public class User { String name; Integer age; public String getName() { return name; } public void setName(String name) { this.name = name; } public Integer getAge() { return age; } public void setAge(Integer age) { this.age = age; }}
3、新建一個控制器類 UserController.java
package com.example.restserver.web;import com.example.restserver.domain.User;import org.springframework.http.MediaType;import org.springframework.web.bind.annotation.PathVariable;import org.springframework.web.bind.annotation.RequestMapping;import org.springframework.web.bind.annotation.RestController;@RestControllerpublic class UserController { @RequestMapping(value='/user/{name}', produces = MediaType.APPLICATION_JSON_VALUE) public User user(@PathVariable String name) { User u = new User(); u.setName(name); u.setAge(30); return u; }}
項目結構如下:
訪問http://localhost:8080/user/lc,頁面顯示:
{'name':'lc','age':30}
二、使用RestTemplae調用服務
1、IDEA新建一個名稱為rest-client的Spring Boot項目
2、新建一個含有main方法的普通類RestTemplateMain.java,調用服務
package com.example.restclient;import com.example.restclient.domain.User;import org.springframework.web.client.RestTemplate;public class RestTemplateMain { public static void main(String[] args){ RestTemplate tpl = new RestTemplate(); User u = tpl.getForObject('http://localhost:8080/user/lc', User.class); System.out.println(u.getName() + ',' + u.getAge()); }}
右鍵Run ’RestTemplateMain.main()’,控制臺輸出:lc,30
3、在bean里面使用RestTemplate,可使用RestTemplateBuilder,新建類UserService.java
package com.example.restclient.service;import com.example.restclient.domain.User;import org.springframework.beans.factory.annotation.Autowired;import org.springframework.boot.web.client.RestTemplateBuilder;import org.springframework.context.annotation.Bean;import org.springframework.stereotype.Service;import org.springframework.web.client.RestTemplate;@Servicepublic class UserService { @Autowired private RestTemplateBuilder builder; @Bean public RestTemplate restTemplate(){ return builder.rootUri('http://localhost:8080').build(); } public User userBuilder(String name){ User u = restTemplate().getForObject('/user/' + name, User.class); return u; }}
4、編寫一個單元測試類,來測試上面的UserService的bean。
package com.example.restclient.service;import com.example.restclient.domain.User;import org.junit.Assert;import org.junit.Test;import org.junit.runner.RunWith;import org.springframework.beans.factory.annotation.Autowired;import org.springframework.boot.test.context.SpringBootTest;import org.springframework.test.context.junit4.SpringRunner;@RunWith(SpringRunner.class)@SpringBootTest(webEnvironment = SpringBootTest.WebEnvironment.NONE)public class UserServiceTest { @Autowired private UserService userService; @Test public void testUser(){ User u = userService.userBuilder('lc'); Assert.assertEquals('lc', u.getName()); }}
5、控制器類UserController.cs 中調用
配置在application.properties 配置端口和8080不一樣,如server.port = 9001
@Autowired private UserService userService; @RequestMapping(value='/user/{name}', produces = MediaType.APPLICATION_JSON_VALUE) public User user(@PathVariable String name) { User u = userService.userBuilder(name); return u; }
三、使用Feign調用服務
繼續在rest-client項目基礎上修改代碼。
1、pom.xml添加依賴
<dependency> <groupId>io.github.openfeign</groupId> <artifactId>feign-core</artifactId> <version>9.5.0</version> </dependency> <dependency> <groupId>io.github.openfeign</groupId> <artifactId>feign-gson</artifactId> <version>9.5.0</version> </dependency>
2、新建接口UserClient.java
package com.example.restclient.service;import com.example.restclient.domain.User;import feign.Param;import feign.RequestLine;public interface UserClient { @RequestLine('GET /user/{name}') User getUser(@Param('name')String name);}
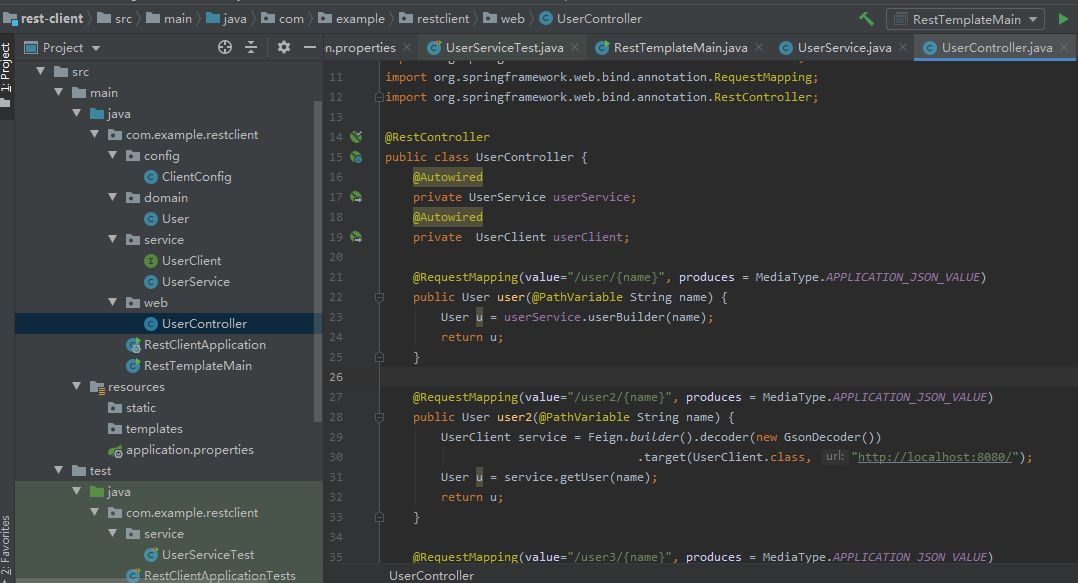
3、在控制器類UserController.java 中調用
decoder(new GsonDecoder()) 表示添加了解碼器的配置,GsonDecoder會將返回的JSON字符串轉換為接口方法返回的對象。相反的,encoder(new GsonEncoder())則是編碼器,將對象轉換為JSON字符串。
@RequestMapping(value='/user2/{name}', produces = MediaType.APPLICATION_JSON_VALUE) public User user2(@PathVariable String name) { UserClient service = Feign.builder().decoder(new GsonDecoder()) .target(UserClient.class, 'http://localhost:8080/'); User u = service.getUser(name); return u; }
4、優化第3步代碼,并把請求地址放到配置文件中。
(1)application.properties 添加配置
復制代碼 代碼如下:application.client.url = http://localhost:8080
(2)新建配置類ClientConfig.java
package com.example.restclient.config;import com.example.restclient.service.UserClient;import feign.Feign;import feign.gson.GsonDecoder;import org.springframework.beans.factory.annotation.Value;import org.springframework.context.annotation.Bean;import org.springframework.context.annotation.Configuration;@Configurationpublic class ClientConfig { @Value('${application.client.url}') private String clientUrl; @Bean UserClient userClient(){ UserClient client = Feign.builder().decoder(new GsonDecoder()).target(UserClient.class, clientUrl); return client; }}
(3)控制器 UserController.java 中調用
@Autowired private UserClient userClient; @RequestMapping(value='/user3/{name}', produces = MediaType.APPLICATION_JSON_VALUE) public User user3(@PathVariable String name) { User u = userClient.getUser(name); return u; }
UserController.java最終內容:
package com.example.restclient.web;import com.example.restclient.domain.User;import com.example.restclient.service.UserClient;import com.example.restclient.service.UserService;import feign.Feign;import feign.gson.GsonDecoder;import org.springframework.beans.factory.annotation.Autowired;import org.springframework.http.MediaType;import org.springframework.web.bind.annotation.PathVariable;import org.springframework.web.bind.annotation.RequestMapping;import org.springframework.web.bind.annotation.RestController;@RestControllerpublic class UserController { @Autowired private UserService userService; @Autowired private UserClient userClient; @RequestMapping(value='/user/{name}', produces = MediaType.APPLICATION_JSON_VALUE) public User user(@PathVariable String name) { User u = userService.userBuilder(name); return u; } @RequestMapping(value='/user2/{name}', produces = MediaType.APPLICATION_JSON_VALUE) public User user2(@PathVariable String name) { UserClient service = Feign.builder().decoder(new GsonDecoder()) .target(UserClient.class, 'http://localhost:8080/'); User u = service.getUser(name); return u; } @RequestMapping(value='/user3/{name}', produces = MediaType.APPLICATION_JSON_VALUE) public User user3(@PathVariable String name) { User u = userClient.getUser(name); return u; }}
項目結構
先后訪問下面地址,可見到輸出正常結果
http://localhost:9001/user/lchttp://localhost:9001/user2/lc2http://localhost:9001/user3/lc3
以上就是本文的全部內容,希望對大家的學習有所幫助,也希望大家多多支持好吧啦網。
相關文章:

 網公網安備
網公網安備