Spring中bean的初始化和銷毀幾種實(shí)現(xiàn)方式詳解
Bean的生命周期 : 創(chuàng)建bean對(duì)象 ? 屬性賦值 ? 初始化方法調(diào)用前的操作 ? 初始化方法 ? 初始化方法調(diào)用后的操作 ? …-- 銷毀前操作 ? 銷毀方法的調(diào)用。
【1】init-method和destroy-method
自定義初始化方法和銷毀方法兩種方式:xml配置和注解。
① xml配置
<bean scope='singleton' init-method='init' destroy-method='cleanUp' autowire='byName' lazy-init='true' > </bean>
② 注解配置
@Scope('singleton') @Lazy @Bean(name='person',initMethod='init',destroyMethod='cleanUp', autowire=Autowire.BY_NAME) public Person person01(){ return new Person('lisi', 20); }
單實(shí)例bean在容器創(chuàng)建完成前會(huì)進(jìn)行創(chuàng)建并初始化,在容器銷毀的時(shí)候進(jìn)行銷毀。多實(shí)例bean(scope=prototype)在第一次獲取該bean實(shí)例時(shí)才會(huì)創(chuàng)建并初始化,且容器不負(fù)責(zé)該bean的銷毀。
【2】InitializingBean 和DisposableBean
InitializingBean 接口:
public interface InitializingBean {void afterPropertiesSet() throws Exception;}
在BeanFactory設(shè)置完bean屬性后執(zhí)行
需要被bean實(shí)現(xiàn)的接口,一旦bean的屬性被BeanFactory設(shè)置后需要做出反應(yīng): 如,執(zhí)行自定義初始化,或者僅僅是檢查是否設(shè)置了所有強(qiáng)制屬性。
實(shí)現(xiàn)InitializingBean 的可替代方式為給bean指定一個(gè)自定義的init-method,例如在一個(gè)xml bean 定義中。
在bean的屬性設(shè)置之后進(jìn)行操作,不返回任何值但是允許拋出異常。
DisposableBean接口:
public interface DisposableBean {void destroy() throws Exception;}
被bean實(shí)現(xiàn)的接口,在銷毀時(shí)釋放資源,在Bean銷毀的時(shí)候調(diào)用該方法。
如果銷毀一個(gè)緩存的單例,一個(gè)BeanFactory 可能會(huì)調(diào)用這個(gè)銷毀方法。
在容器關(guān)閉時(shí),應(yīng)用上下文會(huì)銷毀所有的單例bean。
一種替代實(shí)現(xiàn)DisposableBean 接口的方案為指定一個(gè)自定義的destroy-method方法,例如在一個(gè)xml bean定義中。
自定義bean實(shí)現(xiàn)上述兩個(gè)接口
@Componentpublic class Cat implements InitializingBean,DisposableBean {public Cat(){System.out.println('cat constructor...');}@Overridepublic void destroy() throws Exception {// TODO Auto-generated method stubSystem.out.println('cat...destroy...');}@Overridepublic void afterPropertiesSet() throws Exception {// TODO Auto-generated method stubSystem.out.println('cat...afterPropertiesSet...');}}
測試結(jié)果
cat constructor...cat...afterPropertiesSet...容器創(chuàng)建完成...四月 08, 2018 6:35:46 下午 org.springframework.context.annotation.AnnotationConfigApplicationContext doClose信息: Closing org.springframework.context.annotation.AnnotationConfigApplicationContext@11028347: startup date [Sun Apr 08 18:35:46 CST 2018]; root of context hierarchycat...destroy...
【3】@PostConstruct和@PreDestroy
使用JSR250規(guī)范定義的兩個(gè)注解:
@PostConstruct: PostConstruct注解作用在方法上,在依賴注入完成后進(jìn)行一些初始化操作。這個(gè)方法在類被放入service之前被調(diào)用,所有支持依賴項(xiàng)注入的類都必須支持此注解。
@PreDestroy:在容器銷毀bean之前通知我們進(jìn)行清理工作
自定義類使用上述兩個(gè)注解
@Componentpublic class Dog implements ApplicationContextAware {//@Autowiredprivate ApplicationContext applicationContext;public Dog(){System.out.println('dog constructor...');}//對(duì)象創(chuàng)建并賦值之后調(diào)用@PostConstructpublic void init(){System.out.println('Dog....@PostConstruct...');}//容器移除對(duì)象之前@PreDestroypublic void detory(){System.out.println('Dog....@PreDestroy...');}@Overridepublic void setApplicationContext(ApplicationContext applicationContext) throws BeansException {// TODO Auto-generated method stubthis.applicationContext = applicationContext;}}
測試結(jié)果如下
dog constructor...Dog....@PostConstruct...容器創(chuàng)建完成...四月 08, 2018 6:42:11 下午 org.springframework.context.annotation.AnnotationConfigApplicationContext doClose信息: Closing org.springframework.context.annotation.AnnotationConfigApplicationContext@11028347: startup date [Sun Apr 08 18:42:10 CST 2018]; root of context hierarchyDog....@PreDestroy...
【4】BeanPostProcessor-Bean后置處理器
① 什么是bean后置處理器
在bean初始化前后進(jìn)行一些處理工作
postProcessBeforeInitialization:在初始化之前工作 postProcessAfterInitialization:在初始化之后工作其接口源碼如下:
public interface BeanPostProcessor {Object postProcessBeforeInitialization(Object bean, String beanName) throws BeansException;Object postProcessAfterInitialization(Object bean, String beanName) throws BeansException;}
自定義MyBeanPostProcessor實(shí)現(xiàn)該接口:
/** * 后置處理器:初始化前后進(jìn)行處理工作 * 將后置處理器加入到容器中 * @author lfy */@Componentpublic class MyBeanPostProcessor implements BeanPostProcessor {@Overridepublic Object postProcessBeforeInitialization(Object bean, String beanName) throws BeansException {// TODO Auto-generated method stubSystem.out.println('BeanPostProcessor.postProcessBeforeInitialization...'+beanName+'=>'+bean);return bean;}@Overridepublic Object postProcessAfterInitialization(Object bean, String beanName) throws BeansException {// TODO Auto-generated method stubSystem.out.println('BeanPostProcessor.postProcessAfterInitialization...'+beanName+'=>'+bean);return bean;}}
② BeanPostProcessor原理
AbstractAutowireCapableBeanFactory中關(guān)于bean和BeanPostProcessor執(zhí)行次序由上到下
//給bean進(jìn)行屬性賦值populateBean(beanName, mbd, instanceWrapper);//然后調(diào)用initializeBean方法Object initializeBean(final String beanName, final Object bean, RootBeanDefinition mbd){applyBeanPostProcessorsBeforeInitialization(wrappedBean, beanName);//執(zhí)行自定義初始化invokeInitMethods(beanName, wrappedBean, mbd);applyBeanPostProcessorsAfterInitialization(wrappedBean, beanName);}
AbstractAutowireCapableBeanFactory.initializeBean源碼如下:
protected Object initializeBean(final String beanName, final Object bean, RootBeanDefinition mbd) {if (System.getSecurityManager() != null) {AccessController.doPrivileged(new PrivilegedAction<Object>() {@Overridepublic Object run() {invokeAwareMethods(beanName, bean);return null;}}, getAccessControlContext());}else {//調(diào)用意識(shí)/通知方法invokeAwareMethods(beanName, bean);}Object wrappedBean = bean;if (mbd == null || !mbd.isSynthetic()) {//調(diào)用bean后置處理器的前置方法wrappedBean = applyBeanPostProcessorsBeforeInitialization(wrappedBean, beanName);}//調(diào)用初始化方法try {invokeInitMethods(beanName, wrappedBean, mbd);}catch (Throwable ex) {throw new BeanCreationException((mbd != null ? mbd.getResourceDescription() : null),beanName, 'Invocation of init method failed', ex);}if (mbd == null || !mbd.isSynthetic()) {////調(diào)用bean后置處理器的后置方法wrappedBean = applyBeanPostProcessorsAfterInitialization(wrappedBean, beanName);}return wrappedBean;}
AbstractAutowireCapableBeanFactory.invokeInitMethods方法源碼如下:
protected void invokeInitMethods(String beanName, final Object bean, RootBeanDefinition mbd)throws Throwable {boolean isInitializingBean = (bean instanceof InitializingBean);if (isInitializingBean && (mbd == null || !mbd.isExternallyManagedInitMethod('afterPropertiesSet'))) {if (logger.isDebugEnabled()) {logger.debug('Invoking afterPropertiesSet() on bean with name ’' + beanName + '’');}//調(diào)用InitializingBean.afterPropertiesSetif (System.getSecurityManager() != null) {try {AccessController.doPrivileged(new PrivilegedExceptionAction<Object>() {@Overridepublic Object run() throws Exception {((InitializingBean) bean).afterPropertiesSet();return null;}}, getAccessControlContext());}catch (PrivilegedActionException pae) {throw pae.getException();}}else {((InitializingBean) bean).afterPropertiesSet();}}//調(diào)用自定義初始化方法if (mbd != null) {String initMethodName = mbd.getInitMethodName();if (initMethodName != null && !(isInitializingBean && 'afterPropertiesSet'.equals(initMethodName)) &&!mbd.isExternallyManagedInitMethod(initMethodName)) {invokeCustomInitMethod(beanName, bean, mbd);}}}
【5】Spring底層使用BeanPostProcessor
Spring框架底層存在大量BeanPostProcessor,如下圖:
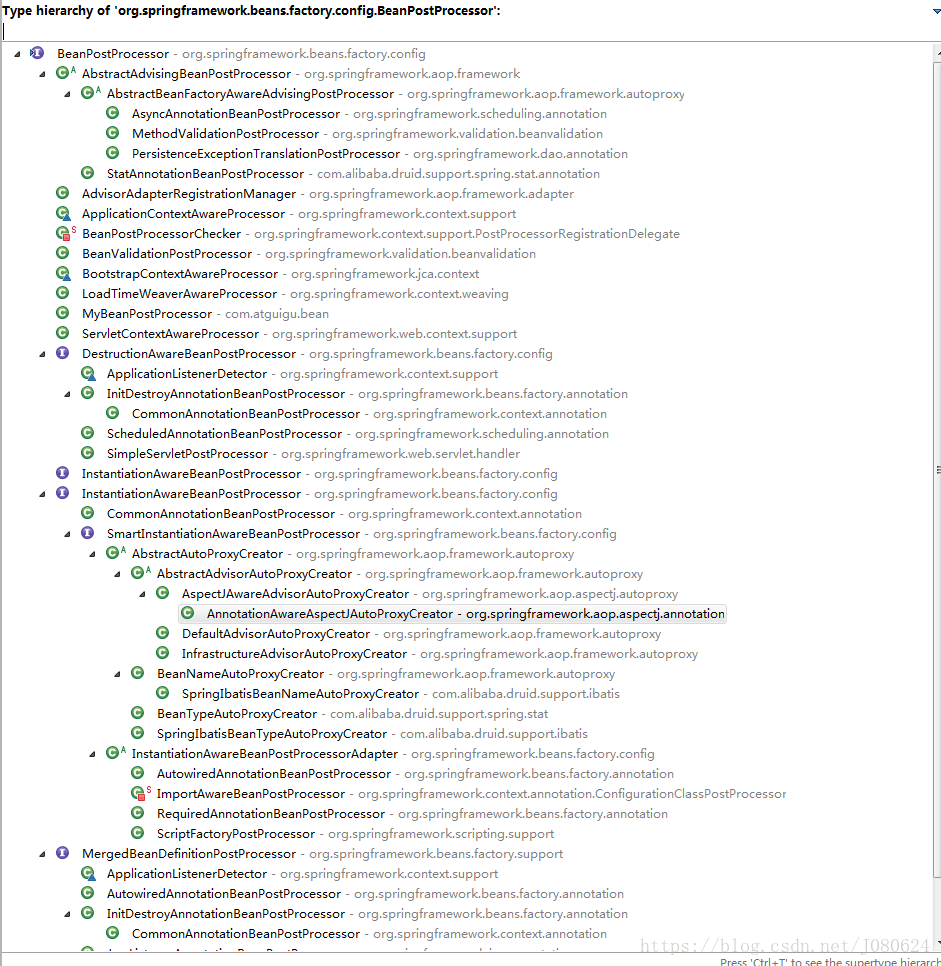
示例一 :BeanValidationPostProcessor是處理bean校驗(yàn)
其Javadoc如下:
/** * Simple {@link BeanPostProcessor} that checks JSR-303 constraint annotations * in Spring-managed beans, throwing an initialization exception in case of * constraint violations right before calling the bean’s init method (if any). * * @author Juergen Hoeller * @since 3.0 */public class BeanValidationPostProcessor implements BeanPostProcessor, InitializingBean {private Validator validator;private boolean afterInitialization = false;//...}
示例二:ApplicationContextAwareProcessor幫助獲取容器上下文
其Javadoc如下:
/** * {@link org.springframework.beans.factory.config.BeanPostProcessor} * implementation that passes the ApplicationContext to beans that * implement the {@link EnvironmentAware}, {@link EmbeddedValueResolverAware}, * {@link ResourceLoaderAware}, {@link ApplicationEventPublisherAware}, * {@link MessageSourceAware} and/or {@link ApplicationContextAware} interfaces. * * <p>Implemented interfaces are satisfied in order of their mention above. * * <p>Application contexts will automatically register this with their * underlying bean factory. Applications do not use this directly. * * @author Juergen Hoeller * @author Costin Leau * @author Chris Beams * @since 10.10.2003 * @see org.springframework.context.EnvironmentAware * @see org.springframework.context.EmbeddedValueResolverAware * @see org.springframework.context.ResourceLoaderAware * @see org.springframework.context.ApplicationEventPublisherAware * @see org.springframework.context.MessageSourceAware * @see org.springframework.context.ApplicationContextAware * @see org.springframework.context.support.AbstractApplicationContext#refresh() */class ApplicationContextAwareProcessor implements BeanPostProcessor {private final ConfigurableApplicationContext applicationContext;private final StringValueResolver embeddedValueResolver;//...}
如【3】中的dog類為例,其debug示意圖如下:

【6】初始化和銷毀方式測試
① 如果一個(gè)bean 綜合應(yīng)用下面六種種方式,執(zhí)行順序會(huì)怎樣呢
Bean類如下:
public class Person implements InitializingBean,DisposableBean { private String name; private Integer age=1; public Person(String name, Integer age) { this.name = name; this.age = age; System.out.println('Person(String name, Integer age) constructor'+this); } public Person() { super(); System.out.println('Person() constructor'+age); } public Integer getAge() { return age; } public void setAge(Integer age) { this.age = age; } public String getName() { return name; } public void setName(String name) { this.name = name; } @Override public String toString() { return 'Person{' +'name=’' + name + ’’’ +', age=' + age +’}’; }// 自定義init方法 public void init(){ System.out.println('-----Person.init()-----'+this); } // 自定義銷毀方法 public void cleanUp(){ System.out.println('-----Person.cleanUp()-----'+this); }// InitializingBean的實(shí)現(xiàn)方法 @Override public void afterPropertiesSet() throws Exception { System.out.println('-----InitializingBean.afterPropertiesSet()-----'+this); }//DisposableBean 的實(shí)現(xiàn)方法 @Override public void destroy() throws Exception { System.out.println('-----DisposableBean.destroy()-----'+this); } //對(duì)象創(chuàng)建并賦值之后調(diào)用 @PostConstruct public void init2(){ System.out.println('-----@PostConstruct-----'+this); } //容器移除對(duì)象之前 @PreDestroy public void destory2(){ System.out.println('-----@PreDestroy-----'+this); }}
配置類如下:
public class Person implements InitializingBean,DisposableBean { private String name; private Integer age=1; public Person(String name, Integer age) { this.name = name; this.age = age; System.out.println('Person(String name, Integer age) constructor'+this); } public Person() { super(); System.out.println('Person() constructor'+age); } public Integer getAge() { return age; } public void setAge(Integer age) { this.age = age; } public String getName() { return name; } public void setName(String name) { this.name = name; } @Override public String toString() { return 'Person{' +'name=’' + name + ’’’ +', age=' + age +’}’; }// 自定義init方法 public void init(){ System.out.println('-----Person.init()-----'+this); } // 自定義銷毀方法 public void cleanUp(){ System.out.println('-----Person.cleanUp()-----'+this); }// InitializingBean的實(shí)現(xiàn)方法 @Override public void afterPropertiesSet() throws Exception { System.out.println('-----InitializingBean.afterPropertiesSet()-----'+this); }//DisposableBean 的實(shí)現(xiàn)方法 @Override public void destroy() throws Exception { System.out.println('-----DisposableBean.destroy()-----'+this); } //對(duì)象創(chuàng)建并賦值之后調(diào)用 @PostConstruct public void init2(){ System.out.println('-----@PostConstruct-----'+this); } //容器移除對(duì)象之前 @PreDestroy public void destory2(){ System.out.println('-----@PreDestroy-----'+this); }}
測試結(jié)果如下:
// 創(chuàng)建并初始化Person(String name, Integer age) constructorPerson{name=’lisi’, age=20}-----@PostConstruct-----Person{name=’lisi’, age=20}-----InitializingBean.afterPropertiesSet()-----Person{name=’lisi’, age=20}-----Person.init()-----Person{name=’lisi’, age=20}//容器將要銷毀-----@PreDestroy-----Person{name=’lisi’, age=20}-----DisposableBean.destroy()-----Person{name=’lisi’, age=20}-----Person.cleanUp()-----Person{name=’lisi’, age=20}
即,最先使用bean的構(gòu)造器為bean屬性賦值,接著JSR250規(guī)范定義的兩個(gè)注解,其次是InitializingBean和DisposableBean接口,最后才是我們自定義的初始化方法和銷毀方法。注意,這里還沒有引入BeanPostProcessor。
② 在①的基礎(chǔ)上添加BeanPostProcessor
實(shí)例化bean并進(jìn)行初始化
//調(diào)用構(gòu)造方法Person(String name, Integer age) constructorPerson{name=’lisi’, age=20}//bean初始化前BeanPostProcessor.postProcessBeforeInitialization...person=>Person{name=’lisi’, age=20}//初始化操作-----@PostConstruct-----Person{name=’lisi’, age=20}-----InitializingBean.afterPropertiesSet()-----Person{name=’lisi’, age=20}-----Person.init()-----Person{name=’lisi’, age=20}//bean初始化后操作BeanPostProcessor.postProcessAfterInitialization...person=>Person{name=’lisi’, age=20}
過程如下:類構(gòu)造函數(shù)-->BeanPostProcessor-->@PostConstruct-->InitializingBean-->init()-->BeanPostProcessor
銷毀bean
-----@PreDestroy-----Person{name=’lisi’, age=20}-----DisposableBean.destroy()-----Person{name=’lisi’, age=20}-----Person.cleanUp()-----Person{name=’lisi’, age=20}
完整圖示如下(同顏色的說明相對(duì)應(yīng)):
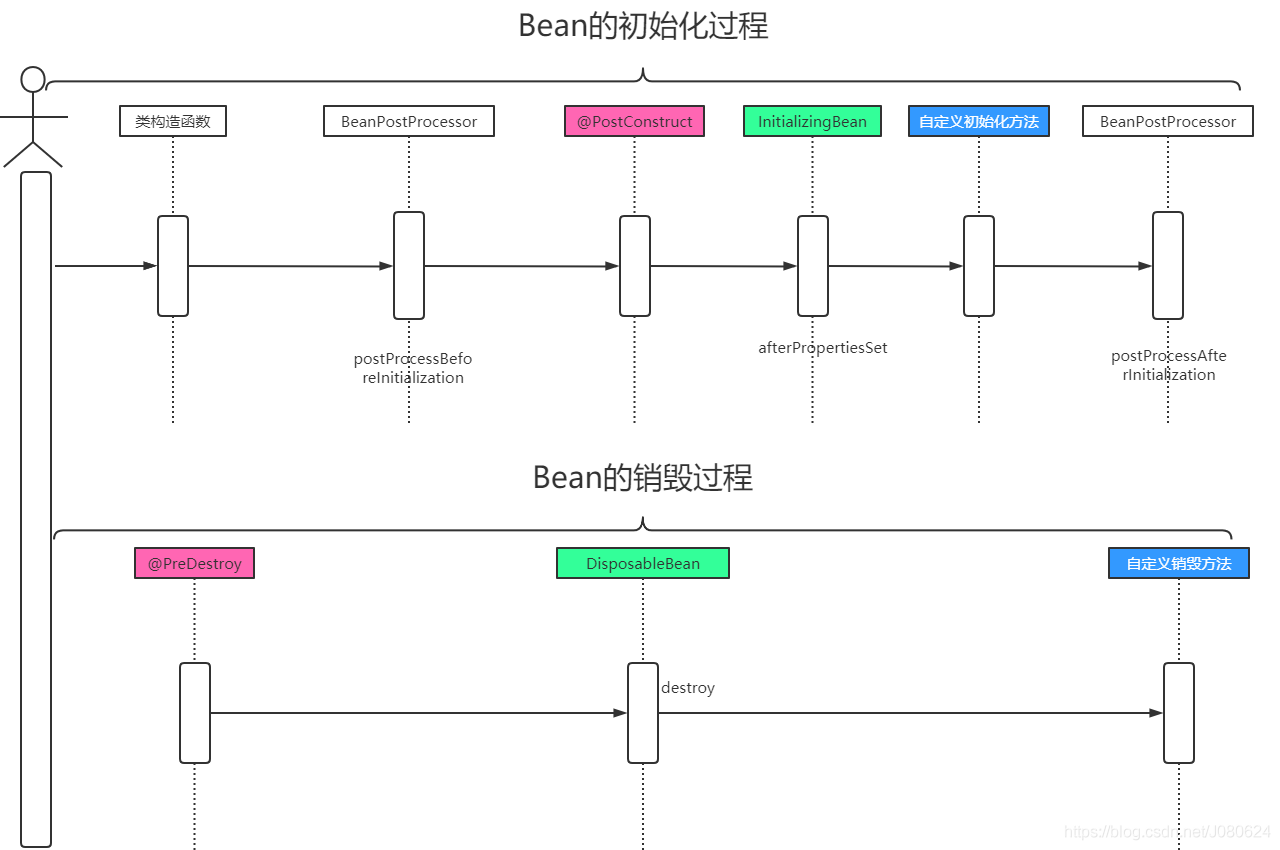
在調(diào)用bean的構(gòu)造函數(shù)時(shí)會(huì)根據(jù)入?yún)閎ean屬性賦值,如果入?yún)榭談t會(huì)給bean屬性賦予默認(rèn)值,引用類型為null,基本類型比如int為0。
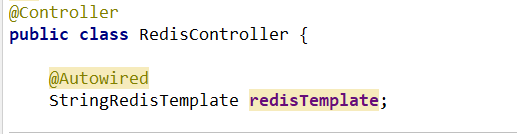
【7】 @Autowired注解的值何時(shí)放入?
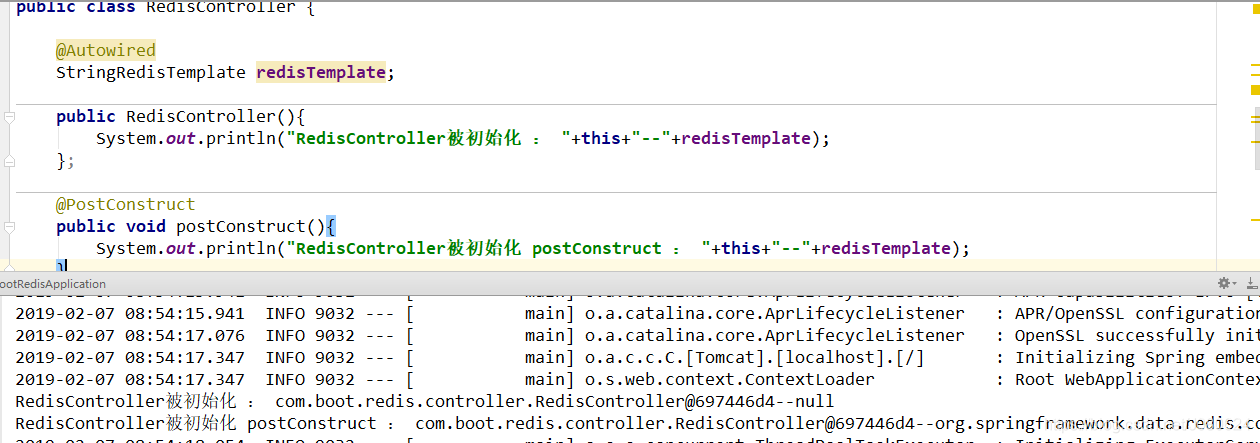
如下所示,redisTemplate這個(gè)依賴何時(shí)被容器注入到RedisController中?
通過上面分析可知,依賴注入是在@PostConstruct注解的方法調(diào)用前被完成的(在populateBean()方法中被注入):
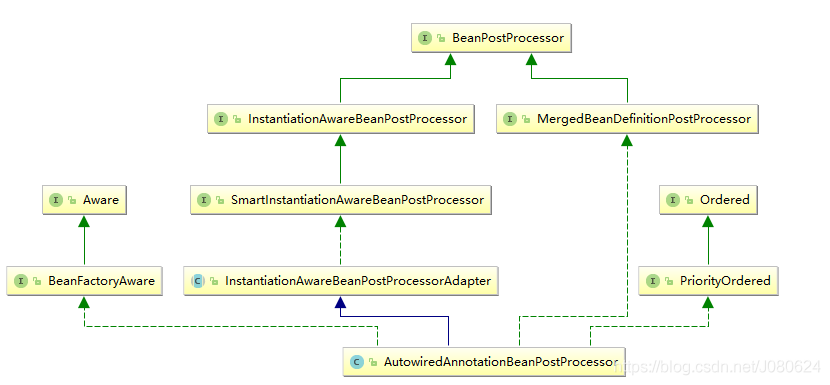
那么具體什么時(shí)候哪個(gè)類完成的 @Autowired注解注入依賴呢?
在類被實(shí)例化后由BeanPostProcessor完成的,哪個(gè)BeanPostProcessor?
具體是由AutowiredAnnotationBeanPostProcessor 完成的:
到此這篇關(guān)于Spring中bean的初始化和銷毀幾種實(shí)現(xiàn)方式詳解的文章就介紹到這了,更多相關(guān)Spring中bean初始化和銷毀內(nèi)容請(qǐng)搜索好吧啦網(wǎng)以前的文章或繼續(xù)瀏覽下面的相關(guān)文章希望大家以后多多支持好吧啦網(wǎng)!
相關(guān)文章:

 網(wǎng)公網(wǎng)安備