IDEA SpringBoot 項目配置Swagger2的詳細教程
在項目中也經常用到swagger2,于是動手記錄一下swagger2配置過程,希望能帶來一點幫助。
在SpringBoot項目當中使用Swagger主要分為以下幾步:
1、SpringBoot-web項目并添加pom.xml依賴
2、編寫HelloController,測試成功運行
3、創建一個SwaggerConfig類,配置swagger-ui
流程確實是很簡單的,但是能真正的在項目中活用swagger卻不是那么簡單
1、SpringBoot-web項目并添加pom.xml依賴
可以直接在maven repository搜索
多最一句,一般在選擇maven依賴時,我們趨向于選擇最穩定版本,可以通過Usages判斷,盡量不要選擇最新版,及時并沒有什么影響。詳細經歷過版本沖突和版本不兼容的小伙伴應該深有體會。

<!-- https://mvnrepository.com/artifact/io.springfox/springfox-swagger2 --><dependency> <groupId>io.springfox</groupId> <artifactId>springfox-swagger2</artifactId> <version>2.9.2</version></dependency><!-- https://mvnrepository.com/artifact/io.springfox/springfox-swagger-ui --><dependency> <groupId>io.springfox</groupId> <artifactId>springfox-swagger-ui</artifactId> <version>2.9.2</version></dependency>
2、編寫HelloController,測試成功運行
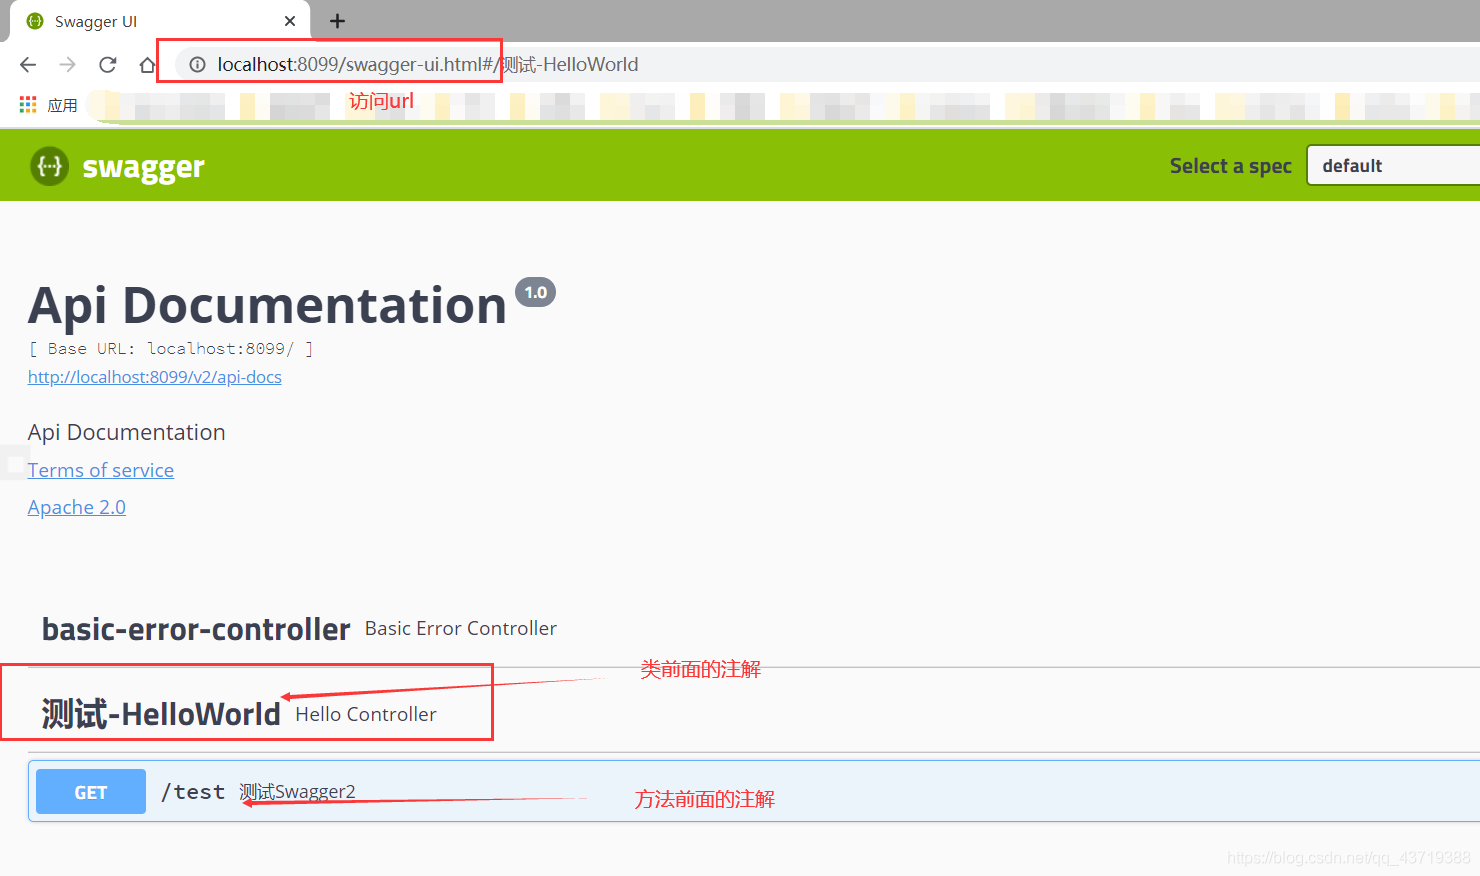
package cn.swpu.myblog.controller;import io.swagger.annotations.Api;import io.swagger.annotations.ApiOperation;import org.springframework.stereotype.Controller;import org.springframework.web.bind.annotation.RequestMapping;import org.springframework.web.bind.annotation.RequestMethod;@Controller@Api(tags = '測試-HelloWorld') //這個controller下的所有接口的描述public class HelloController { @ApiOperation('測試Swagger2') //顯示在接口的信息說明 @RequestMapping(value = '/test', method = RequestMethod.GET) //請求路徑和類型 public void testSwagger(){ }}
3、創建一個SwaggerConfig類,配置swagger-ui
package cn.swpu.myblog.config;import org.springframework.context.annotation.Configuration;import springfox.documentation.swagger2.annotations.EnableSwagger2;@Configuration@EnableSwagger2public class SwaggerConfig {}
然后就可以根據你的端口訪問swagger-ui了,例如我的是8099
http://localhost:8099/swagger-ui.html#/

至此IDEA 繼承Swagger就可以了,但這僅僅只是個開始,swagger還是有很多的實用技巧。
到此這篇關于IDEA SpringBoot 項目配置Swagger2的詳細教程的文章就介紹到這了,更多相關IDEA SpringBoot 項目配置Swagger2內容請搜索好吧啦網以前的文章或繼續瀏覽下面的相關文章希望大家以后多多支持好吧啦網!
相關文章:
 網公網安備
網公網安備