Vue實現仿iPhone懸浮球的示例代碼
懸浮球插件簡單的效果圖:
很遺憾,沒找到太好的視頻轉gif的軟件,壓縮出來的大小超過了限制,就不放圖了
可以參考其他人的圖,效果一致:
簡單實用案例:
<!-- 給定一個初始位置position,插槽中填寫想滑動的部分 --><xuanfuqiu :position='position'><d-add-button @click='addPigFarm' add-item='豬場'></d-add-button></xuanfuqiu>
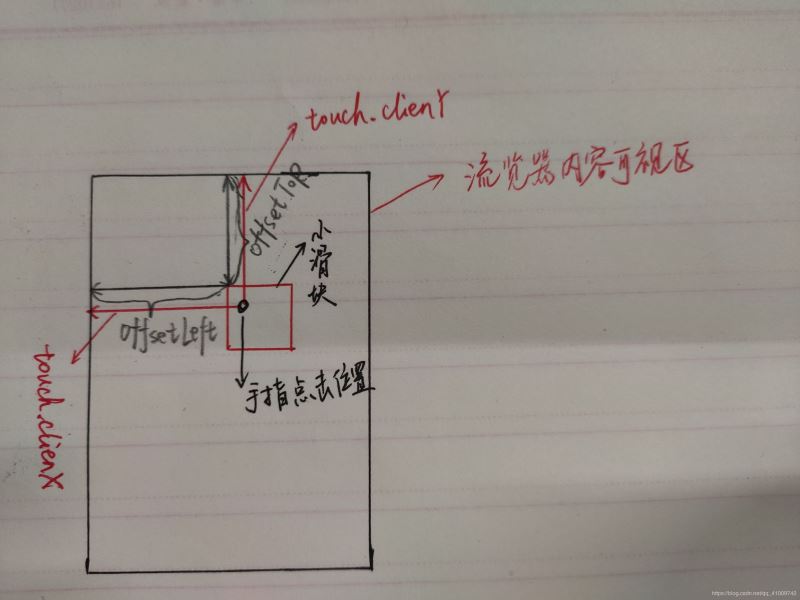
原理示意圖
請結合代碼注釋來理解
懸浮球插件代碼如下:
<template> <div> <div : @mousedown='down' @touchstart='down' @mousemove='move' @touchmove='move' @mouseup='end' @touchend='end'> <slot></slot> </div> </div></template><script>export default { name: '', components: {}, props: { // 通過position來設置初始定位 position: { type: Object, default: function() {return { top: '32.25rem', left: '18.34375rem'} } }, // 通過fixed來禁用自由移動 fixed: { type: Boolean, default: false } }, data() { return { flags: false, positionTemp: { x: 0, y: 0 }, // 記錄手指點擊的位置 nx: ’’, ny: ’’, dx: ’’, dy: ’’, xPum: ’’, yPum: ’’, } }, watch: {}, computed: {}, methods: { // 實現移動端拖拽 down(){ if (this.fixed) {return } this.flags = true; var touch; // 該if判斷是用touch還是mouse來移動 if (event.touches) {touch = event.touches[0]; } else {touch = event; } this.positionTemp.x = touch.clientX; // 手指點擊后的位置 this.positionTemp.y = touch.clientY; this.dx = moveDiv.offsetLeft; // 移動的div元素的位置 this.dy = moveDiv.offsetTop; // console.log('moveDiv.offsetLeft', moveDiv.offsetLeft) // console.log('touch.clientX', touch.clientX) }, move(){ if(this.flags) {var touch ;if(event.touches){ touch = event.touches[0];}else { touch = event;}this.nx = touch.clientX - this.positionTemp.x; // 手指移動的變化量this.ny = touch.clientY - this.positionTemp.y;this.xPum = this.dx + this.nx; // 移動后,div元素的位置this.yPum = this.dy + this.ny;let windowWidth = document.documentElement.clientWidthlet windowHeight = document.documentElement.clientHeight// console.log('window.clientWidth', windowWidth)// console.log(this.xPum)// console.log(' moveDiv.clientWidth', moveDiv.clientWidth)if (this.xPum > 0 && (this.xPum + moveDiv.clientWidth < windowWidth)) {// movediv的左右邊,未出界 moveDiv.style.left = this.xPum + 'px';} else if (this.xPum <= 0) { // 左邊出界,則左邊緣貼邊 moveDiv.style.left = 0 + 'px';} else if (this.xPum + moveDiv.clientWidth >= windowWidth) { // 右邊緣出界 moveDiv.style.left = (windowWidth - moveDiv.clientWidth) + 'px'; // console.log('dx', windowWidth - moveDiv.clientWidth)}// 上下未出界if (this.yPum > 0 && (this.yPum + moveDiv.clientHeight < windowHeight)) { moveDiv.style.top = this.yPum +'px';} else if (this.yPum <= 0) { // 上邊緣出界 moveDiv.style.top = 0 + 'px'} else if (this.yPum + moveDiv.clientHeight >= windowHeight) { // 下邊緣 // console.log('windowHeight:', windowHeight) // console.log('moveDiv.clientHeight:', moveDiv.clientHeight) // console.log(this.yPum + moveDiv.clientHeight) moveDiv.style.top = windowHeight - moveDiv.clientHeight + 'px'}// 阻止頁面的滑動默認事件,為了只讓懸浮球滑動,其他部分不滑動;如果碰到滑動問題,1.2 請注意是否獲取到 touchmove, 系統默認passive: true,無法使用preventDefault// document.addEventListener('touchmove', function(){// event.preventDefault();// }, { passive: false });// document.addEventListener('mousemove', function(){// event.preventDefault();// }, { passive: false });document.addEventListener('touchmove', this.preventDefault, { passive: false })document.addEventListener('mousemove', this.preventDefault, { passive: false }) } }, //鼠標釋放時候的函數,鼠標釋放,移除之前添加的偵聽事件,將passive設置為true,不然背景會滑動不了 end(){ this.flags = false // 注意事項,在添加和刪除監聽事件時,其function必須是同名的函數,不能為匿名函數。 document.removeEventListener(’touchmove’,this.preventDefault, false) document.removeEventListener(’mousemove’,this.preventDefault, false) // 下面兩句是保證在移除監聽事件后,除了懸浮球的部分還能夠滑動,如果不添加,則無法滑動 document.addEventListener('touchmove', function(e) {window.event.returnValue = true }) document.addEventListener('mousemove', function(e) {window.event.returnValue = true }) }, preventDefault(e) { e.preventDefault() } }, created() {}, mounted() {}}</script><style lang='scss' scoped>.xuanfu { /* 如果碰到滑動問題,1.3 請檢查 z-index。z-index需比web大一級*/ z-index: 999; position: fixed; // 這里的定位方式有待考量,fixed的話存在未知設置不合理,跑出屏幕不顯示的問題}</style>
到此這篇關于Vue實現仿iPhone懸浮球的示例代碼的文章就介紹到這了,更多相關Vue 懸浮球內容請搜索好吧啦網以前的文章或繼續瀏覽下面的相關文章希望大家以后多多支持好吧啦網!
相關文章:

 網公網安備
網公網安備