如何將tensorflow訓練好的模型移植到Android (MNIST手寫數字識別)
【尊重原創,轉載請注明出處】https://blog.csdn.net/guyuealian/article/details/79672257
項目Github下載地址:https://github.com/PanJinquan/Mnist-tensorFlow-AndroidDemo
本博客將以最簡單的方式,利用TensorFlow實現了MNIST手寫數字識別,并將Python TensoFlow訓練好的模型移植到Android手機上運行。網上也有很多移植教程,大部分是在Ubuntu(Linux)系統,一般先利用Bazel工具把TensoFlow編譯成.so庫文件和jar包,再進行Android配置,實現模型移植。不會使用Bazel也沒關系,實質上TensoFlow已經為開發者提供了最新的.so庫文件和對應的jar包了(如libtensorflow_inference.so和libandroid_tensorflow_inference_java.jar),我們只需要下載文件,并在本地Android Studio導入jar包和.so庫文件,即可以在Android加載TensoFlow的模型了。
當然了,本博客的項目代碼都上傳到Github:https://github.com/PanJinquan/Mnist-tensorFlow-AndroidDemo
先說一下,本人的開發環境:
Windows 7 Python3.5 TensoFlow 1.6.0(2018年3月23日—當前最新版) Android Studio 3.0.1(2018年3月23日—當前最新版)一、利用Python訓練模型
以MNIST手寫數字識別為例,這里首先使用Python版的TensorFlow實現單隱含層的SoftMax Regression分類器,并將訓練好的模型的網絡拓撲結構和參數保存為pb文件。首先,需要定義模型的輸入層和輸出層節點的名字(通過形參 ’name’指定,名字可以隨意,后面加載模型時,都是通過該name來傳遞數據的):
x = tf.placeholder(tf.float32,[None,784],name=’x_input’)#輸入節點:x_input...pre_num=tf.argmax(y,1,output_type=’int32’,name='output')#輸出節點:output
PS:說一下鄙人遇到坑:起初,我參照網上相關教程訓練了一個模型,在Windows下測試沒錯,但把模型移植到Android后就出錯了,但用別人的模型又正常運行;后來折騰了半天才發現,是類型轉換出錯啦!!!!TensorFlow默認類型是float32,但我們希望返回的是一個int型,因此需要指定output_type=’int32’;但注意了,在Windows下測試使用int64和float64都是可以的,但在Android平臺上只能使用int32和float32,并且對應Java的int和float類型。
將訓練好的模型保存為.pb文件,這就需要用到tf.graph_util.convert_variables_to_constants函數了。
# 保存訓練好的模型#形參output_node_names用于指定輸出的節點名稱,output_node_names=[’output’]對應pre_num=tf.argmax(y,1,name='output'),output_graph_def = graph_util.convert_variables_to_constants(sess, sess.graph_def,output_node_names=[’output’])with tf.gfile.FastGFile(’model/mnist.pb’, mode=’wb’) as f:#’wb’中w代表寫文件,b代表將數據以二進制方式寫入文件。 f.write(output_graph_def.SerializeToString())
關于tensorflow保存模型和加載模型的方法,請參考本人另一篇博客:https://www.jb51.net/article/138932.htm
這里給出Python訓練模型完整的代碼如下:
#coding=utf-8# 單隱層SoftMax Regression分類器:訓練和保存模型模塊from tensorflow.examples.tutorials.mnist import input_dataimport tensorflow as tffrom tensorflow.python.framework import graph_utilprint(’tensortflow:{0}’.format(tf.__version__)) mnist = input_data.read_data_sets('Mnist_data/', one_hot=True) #create modelwith tf.name_scope(’input’): x = tf.placeholder(tf.float32,[None,784],name=’x_input’)#輸入節點名:x_input y_ = tf.placeholder(tf.float32,[None,10],name=’y_input’)with tf.name_scope(’layer’): with tf.name_scope(’W’): #tf.zeros([3, 4], tf.int32) ==> [[0, 0, 0, 0], [0, 0, 0, 0], [0, 0, 0, 0]] W = tf.Variable(tf.zeros([784,10]),name=’Weights’) with tf.name_scope(’b’): b = tf.Variable(tf.zeros([10]),name=’biases’) with tf.name_scope(’W_p_b’): Wx_plus_b = tf.add(tf.matmul(x, W), b, name=’Wx_plus_b’) y = tf.nn.softmax(Wx_plus_b, name=’final_result’) # 定義損失函數和優化方法with tf.name_scope(’loss’): loss = -tf.reduce_sum(y_ * tf.log(y))with tf.name_scope(’train_step’): train_step = tf.train.GradientDescentOptimizer(0.01).minimize(loss) print(train_step)# 初始化sess = tf.InteractiveSession()init = tf.global_variables_initializer()sess.run(init)# 訓練for step in range(100): batch_xs,batch_ys =mnist.train.next_batch(100) train_step.run({x:batch_xs,y_:batch_ys}) # variables = tf.all_variables() # print(len(variables)) # print(sess.run(b)) # 測試模型準確率pre_num=tf.argmax(y,1,output_type=’int32’,name='output')#輸出節點名:outputcorrect_prediction = tf.equal(pre_num,tf.argmax(y_,1,output_type=’int32’))accuracy = tf.reduce_mean(tf.cast(correct_prediction,tf.float32))a = accuracy.eval({x:mnist.test.images,y_:mnist.test.labels})print(’測試正確率:{0}’.format(a)) # 保存訓練好的模型#形參output_node_names用于指定輸出的節點名稱,output_node_names=[’output’]對應pre_num=tf.argmax(y,1,name='output'),output_graph_def = graph_util.convert_variables_to_constants(sess, sess.graph_def,output_node_names=[’output’])with tf.gfile.FastGFile(’model/mnist.pb’, mode=’wb’) as f:#’wb’中w代表寫文件,b代表將數據以二進制方式寫入文件。 f.write(output_graph_def.SerializeToString())sess.close()
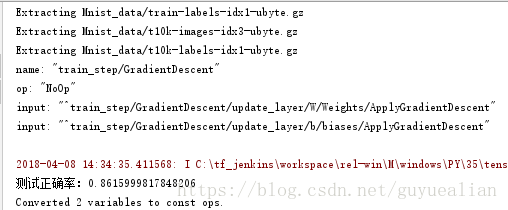
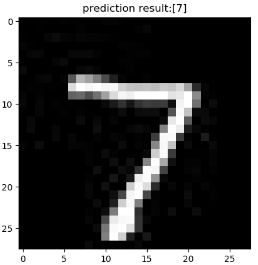
上面的代碼已經將訓練模型保存在model/mnist.pb,當然我們可以先在Python中使用該模型進行簡單的預測,測試方法如下:
import tensorflow as tfimport numpy as npfrom PIL import Imageimport matplotlib.pyplot as plt #模型路徑model_path = ’model/mnist.pb’#測試圖片testImage = Image.open('data/test_image.jpg'); with tf.Graph().as_default(): output_graph_def = tf.GraphDef() with open(model_path, 'rb') as f: output_graph_def.ParseFromString(f.read()) tf.import_graph_def(output_graph_def, name='') with tf.Session() as sess: tf.global_variables_initializer().run() # x_test = x_test.reshape(1, 28 * 28) input_x = sess.graph.get_tensor_by_name('input/x_input:0') output = sess.graph.get_tensor_by_name('output:0') #對圖片進行測試 testImage=testImage.convert(’L’) testImage = testImage.resize((28, 28)) test_input=np.array(testImage) test_input = test_input.reshape(1, 28 * 28) pre_num = sess.run(output, feed_dict={input_x: test_input})#利用訓練好的模型預測結果 print(’模型預測結果為:’,pre_num) #顯示測試的圖片 # testImage = test_x.reshape(28, 28) fig = plt.figure(), plt.imshow(testImage,cmap=’binary’) # 顯示圖片 plt.title('prediction result:'+str(pre_num)) plt.show()
二、移植到Android
相信大家看到很多大神的博客,都是要自己編譯TensoFlow的so庫和jar包,說實在的,這個過程真TM麻煩,反正我弄了半天都沒成功過,然后放棄了……。本博客的移植方法不需要安裝Bazel,也不需要構建TensoFlow的so庫和jar包,因為Google在TensoFlow github中給我們提供了,為什么不用了!!!
1、下載TensoFlow的jar包和so庫
TensoFlow在Github已經存放了很多開發文件:https://github.com/PanJinquan/tensorflow

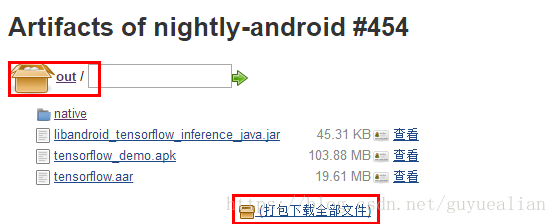
我們需要做的是,下載Android: native libs ,打包下載全部文件,其中有我們需要的libtensorflow_inference.so和libandroid_tensorflow_inference_java.jar,有了這兩個文件,剩下的就是在Android Studio配置的問題了
2、Android Studio配置
(1)新建一個Android項目
(2)把訓練好的pb文件(mnist.pb)放入Android項目中app/src/main/assets下,若不存在assets目錄,右鍵main->new->Directory,輸入assets。
(3)將下載的libtensorflow_inference.so和libandroid_tensorflow_inference_java.jar如下結構放在libs文件夾下

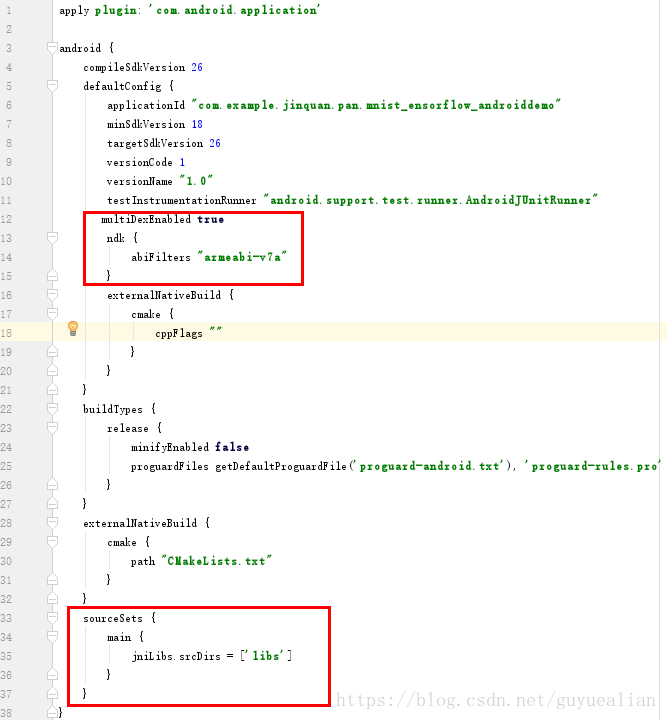
(4)appbuild.gradle配置
在defaultConfig中添加
multiDexEnabled true ndk { abiFilters 'armeabi-v7a' }
增加sourceSets
sourceSets { main { jniLibs.srcDirs = [’libs’] } }
在dependencies中增加TensoFlow編譯的jar文件libandroid_tensorflow_inference_java.jar:
compile files(’libs/libandroid_tensorflow_inference_java.jar’)

OK了,build.gradle配置完成了,剩下的就是java編程的問題了。
3、模型調用
在需要調用TensoFlow的地方,加載so庫“System.loadLibrary('tensorflow_inference');并”import org.tensorflow.contrib.android.TensorFlowInferenceInterface;就可以使用了
注意,舊版的TensoFlow,是如下方式進行,該方法可參考大神的博客:https://www.jb51.net/article/176693.htm
TensorFlowInferenceInterface.fillNodeFloat(); //送入輸入數據TensorFlowInferenceInterface.runInference(); //進行模型的推理TensorFlowInferenceInterface.readNodeFloat(); //獲取輸出數據
但在最新的libandroid_tensorflow_inference_java.jar中,已經沒有這些方法了,換為
TensorFlowInferenceInterface.feed()TensorFlowInferenceInterface.run()TensorFlowInferenceInterface.fetch()
下面是以MNIST手寫數字識別為例,其實現方法如下:
package com.example.jinquan.pan.mnist_ensorflow_androiddemo; import android.content.res.AssetManager;import android.graphics.Bitmap;import android.graphics.Color;import android.graphics.Matrix;import android.util.Log; import org.tensorflow.contrib.android.TensorFlowInferenceInterface; public class PredictionTF { private static final String TAG = 'PredictionTF'; //設置模型輸入/輸出節點的數據維度 private static final int IN_COL = 1; private static final int IN_ROW = 28*28; private static final int OUT_COL = 1; private static final int OUT_ROW = 1; //模型中輸入變量的名稱 private static final String inputName = 'input/x_input'; //模型中輸出變量的名稱 private static final String outputName = 'output'; TensorFlowInferenceInterface inferenceInterface; static { //加載libtensorflow_inference.so庫文件 System.loadLibrary('tensorflow_inference'); Log.e(TAG,'libtensorflow_inference.so庫加載成功'); } PredictionTF(AssetManager assetManager, String modePath) { //初始化TensorFlowInferenceInterface對象 inferenceInterface = new TensorFlowInferenceInterface(assetManager,modePath); Log.e(TAG,'TensoFlow模型文件加載成功'); } /** * 利用訓練好的TensoFlow模型預測結果 * @param bitmap 輸入被測試的bitmap圖 * @return 返回預測結果,int數組 */ public int[] getPredict(Bitmap bitmap) { float[] inputdata = bitmapToFloatArray(bitmap,28, 28);//需要將圖片縮放帶28*28 //將數據feed給tensorflow的輸入節點 inferenceInterface.feed(inputName, inputdata, IN_COL, IN_ROW); //運行tensorflow String[] outputNames = new String[] {outputName}; inferenceInterface.run(outputNames); ///獲取輸出節點的輸出信息 int[] outputs = new int[OUT_COL*OUT_ROW]; //用于存儲模型的輸出數據 inferenceInterface.fetch(outputName, outputs); return outputs; } /** * 將bitmap轉為(按行優先)一個float數組,并且每個像素點都歸一化到0~1之間。 * @param bitmap 輸入被測試的bitmap圖片 * @param rx 將圖片縮放到指定的大小(列)->28 * @param ry 將圖片縮放到指定的大小(行)->28 * @return 返回歸一化后的一維float數組 ->28*28 */ public static float[] bitmapToFloatArray(Bitmap bitmap, int rx, int ry){ int height = bitmap.getHeight(); int width = bitmap.getWidth(); // 計算縮放比例 float scaleWidth = ((float) rx) / width; float scaleHeight = ((float) ry) / height; Matrix matrix = new Matrix(); matrix.postScale(scaleWidth, scaleHeight); bitmap = Bitmap.createBitmap(bitmap, 0, 0, width, height, matrix, true); Log.i(TAG,'bitmap width:'+bitmap.getWidth()+',height:'+bitmap.getHeight()); Log.i(TAG,'bitmap.getConfig():'+bitmap.getConfig()); height = bitmap.getHeight(); width = bitmap.getWidth(); float[] result = new float[height*width]; int k = 0; //行優先 for(int j = 0;j < height;j++){ for (int i = 0;i < width;i++){ int argb = bitmap.getPixel(i,j); int r = Color.red(argb); int g = Color.green(argb); int b = Color.blue(argb); int a = Color.alpha(argb); //由于是灰度圖,所以r,g,b分量是相等的。 assert(r==g && g==b);// Log.i(TAG,i+','+j+' : argb = '+argb+', a='+a+', r='+r+', g='+g+', b='+b); result[k++] = r / 255.0f; } } return result; }}簡單說明一下:項目新建了一個PredictionTF類,該類會先加載libtensorflow_inference.so庫文件;PredictionTF(AssetManager assetManager, String modePath) 構造方法需要傳入AssetManager對象和pb文件的路徑; 從資源文件中獲取BitMap圖片,并傳入 getPredict(Bitmap bitmap)方法,該方法首先將BitMap圖像縮放到28*28的大小,由于原圖是灰度圖,我們需要獲取灰度圖的像素值,并將28*28的像素轉存為行向量的一個float數組,并且每個像素點都歸一化到0~1之間,這個就是bitmapToFloatArray(Bitmap bitmap, int rx, int ry)方法的作用; 然后將數據feed給tensorflow的輸入節點,并運行(run)tensorflow,最后獲取(fetch)輸出節點的輸出信息。
MainActivity很簡單,一個單擊事件獲取預測結果:
package com.example.jinquan.pan.mnist_ensorflow_androiddemo; import android.graphics.Bitmap;import android.graphics.BitmapFactory;import android.support.v7.app.AppCompatActivity;import android.os.Bundle;import android.util.Log;import android.view.View;import android.widget.ImageView;import android.widget.TextView; public class MainActivity extends AppCompatActivity { // Used to load the ’native-lib’ library on application startup. static { System.loadLibrary('native-lib');//可以去掉 } private static final String TAG = 'MainActivity'; private static final String MODEL_FILE = 'file:///android_asset/mnist.pb'; //模型存放路徑 TextView txt; TextView tv; ImageView imageView; Bitmap bitmap; PredictionTF preTF; @Override protected void onCreate(Bundle savedInstanceState) { super.onCreate(savedInstanceState); setContentView(R.layout.activity_main); // Example of a call to a native method tv = (TextView) findViewById(R.id.sample_text); txt=(TextView)findViewById(R.id.txt_id); imageView =(ImageView)findViewById(R.id.imageView1); bitmap = BitmapFactory.decodeResource(getResources(), R.drawable.test_image); imageView.setImageBitmap(bitmap); preTF =new PredictionTF(getAssets(),MODEL_FILE);//輸入模型存放路徑,并加載TensoFlow模型 } public void click01(View v){ String res='預測結果為:'; int[] result= preTF.getPredict(bitmap); for (int i=0;i<result.length;i++){ Log.i(TAG, res+result[i] ); res=res+String.valueOf(result[i])+' '; } txt.setText(res); tv.setText(stringFromJNI()); } /** * A native method that is implemented by the ’native-lib’ native library, * which is packaged with this application. */ public native String stringFromJNI();//可以去掉} activity_main布局文件:
activity_main布局文件:
<?xml version='1.0' encoding='utf-8'?><LinearLayout xmlns:android='http://schemas.android.com/apk/res/android' android:layout_width='match_parent' android:layout_height='match_parent' android:orientation='vertical' android:paddingBottom='16dp' android:paddingLeft='16dp' android:paddingRight='16dp' android:paddingTop='16dp'> <TextView android: android:layout_width='wrap_content' android:layout_height='wrap_content' android:text='https://blog.csdn.net/guyuealian' android:layout_gravity='center'/> <Button android:onClick='click01' android:layout_width='match_parent' android:layout_height='wrap_content' android:text='click' /> <TextView android: android:layout_width='match_parent' android:layout_height='wrap_content' android:gravity='center' android:text='結果為:'/> <ImageView android: android:layout_width='wrap_content' android:layout_height='wrap_content' android:layout_gravity='center'/></LinearLayout>
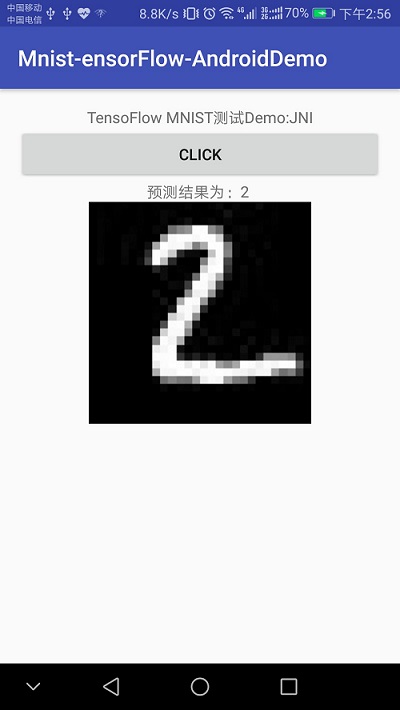
最后一步,就是run,run,run,效果如下,
本博客的項目代碼都上傳到Github:下載地址:https://github.com/PanJinquan/Mnist-tensorFlow-AndroidDemo
相關參考資料:https://www.jb51.net/article/180291.htm
https://www.jb51.net/article/185206.htm
到此這篇關于將tensorflow訓練好的模型移植到Android (MNIST手寫數字識別)的文章就介紹到這了,更多相關tensorflow模型識別MNIST手寫數字內容請搜索好吧啦網以前的文章或繼續瀏覽下面的相關文章希望大家以后多多支持好吧啦網!
相關文章:

 網公網安備
網公網安備