Android Shader著色器/渲染器的用法解析
一、介紹
Shader是繪圖過程中的著色器,它有五個子類:
BitmapShader: 位圖渲染
LinearGradient: 線性渲染
SweepGradient: 梯度渲染
RadialGradient: 光束渲染
ComposeShader: 組合渲染
渲染模式:Shader.TileMode
Shader.TileMode.CLAMP: 邊緣拉伸模式,它會拉伸邊緣的一個像素來填充其他區域。
Shader.TileMode.MIRROR: 鏡像模式,通過鏡像變化來填充其他區域。需要注意的是,鏡像模式先進行y軸方向的鏡像操作,然后在進行x軸方向上的鏡像操作。
Shader.TileMode.REPEAT:重復模式,通過復制來填充其他區域
下面的圖:X軸是邊緣拉伸模式,Y重復模式
鏡像模式:xy軸均是鏡像模式
二、效果介紹:
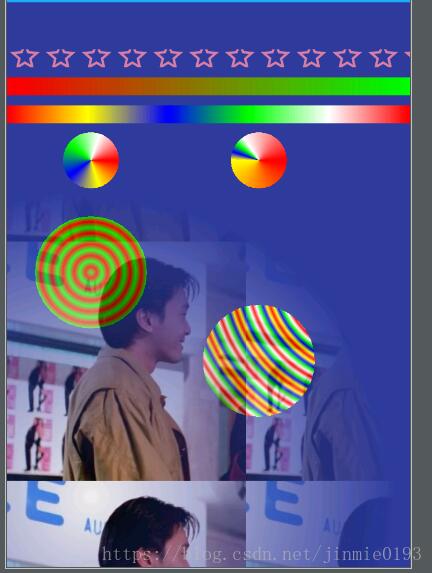
1.BitmapShader: 位圖渲染
構造方法:BitmapShader (Bitmap bitmap, Shader.TileMode tileX, Shader.TileMode tileY)
參數:
bitmap:要處理的bitmap對象
tileX:在X軸處理的效果,Shader.TileMode里有三種模式:CLAMP、MIRROR和REPETA
tileY:在Y軸處理的效果,Shader.TileMode里有三種模式:CLAMP、MIRROR和REPETA
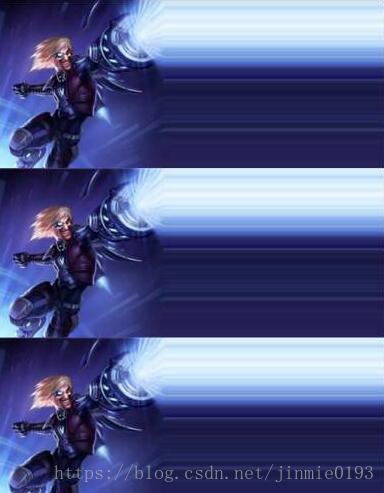
我們給畫筆填充一個五角星,然后繪制一條直線
Shader shader[] = new Shader[8];bitmap = BitmapFactory.decodeResource(getResources(),R.drawable.star);shader[0] = new BitmapShader(bitmap,Shader.TileMode.REPEAT,Shader.TileMode.REPEAT);Paint paint = new Paint();paint.setStyle(Paint.Style.FILL);paint.setStrokeWidth(32);paint.setShader(shader[0]);int lineHeight = 100,lineOffset = 50;canvas.drawLine(0,lineHeight,parentWidth,100,paint);

2.LinearGradient: 線性渲染
LinearGradient是顏色線性漸變的著色器。
構造函數:
LinearGradient (float x0, float y0, float x1, float y1, int color0, int color1, Shader.TileMode tile)
LinearGradient (float x0, float y0, float x1, float y1, int[] colors, float[] positions, Shader.TileMode tile)
參數:
(x0,y0)表示漸變的起點,(x1,y1)表示漸變的終點坐標,這兩點都是相對于屏幕坐標系。
color0,color1分別表示起點的顏色和終點的顏色。
也傳入多個顏色,和每個顏色的起始位置。
colors[]傳入多個顏色值進去
positions[] 位置數組
而且當positions參數傳入null時,代表顏色是均勻的填充整個漸變區域的,顯得比較柔和。
通過兩個構造函數分別畫兩條線:
lineHeight += lineOffset;shader[1] = new LinearGradient(0,lineHeight,parentWidth,lineHeight,Color.RED,Color.GREEN,Shader.TileMode.REPEAT);paint.setShader(shader[1]);canvas.drawLine(0,lineHeight,parentWidth,lineHeight,paint);lineHeight += lineOffset;shader[2] = new LinearGradient(0,lineHeight,parentWidth,lineHeight,GRADIENT_COLORS,null,Shader.TileMode.REPEAT);paint.setShader(shader[2]);canvas.drawLine(0,lineHeight,parentWidth,lineHeight,paint);

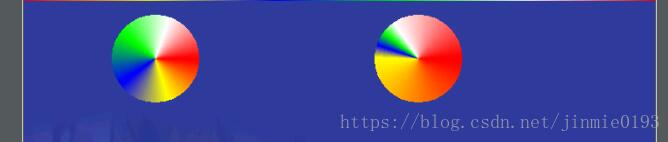
3.SweepGradient: 梯度渲染
SweepGradient是梯度漸變,也稱為掃描式漸變,可以實現雷達掃描效果。
構造函數:
SweepGradient(float cx, float cy, int color0, int color1)
參數:
(cx,cy)表示漸變效果的中心點,也就是雷達掃描的圓點。color0和color1表示漸變的起點色和終點色。
顏色漸變是順時針的,從中心點的x軸正方形開始。
注意:這里構造函數并不需要TileMode,因為梯度漸變的邊界相當于無限大的。
構造函數:
SweepGradient(float cx, float cy,int colors[], float positions[])
參數:
colors[]顏色數組
positions數組,該數組中每一個position對應colors數組中每個顏色在360度中的相對位置,
position取值范圍為[0,1],0和1都表示3點鐘位置,0.25表示6點鐘位置,0.5表示9點鐘位置,0.75表示12點鐘位置,
通過要個構造函數繪制兩個實心圓,其中第二個圓指定positions
public static final int[] GRADIENT_COLORS = new int[]{ Color.RED,Color.YELLOW,Color.BLUE, Color.GREEN, Color.WHITE, Color.RED };public static final float[] GRADIENT_POSITONS = new float[]{ 0.0f,0.5f,0.55f,0.6f,0.65f,1.0f};
lineHeight += lineOffset +32;shader[3] = new SweepGradient(150,lineHeight,GRADIENT_COLORS,null);paint.setShader(shader[3]);canvas.drawCircle(150,lineHeight,50,paint);shader[4] = new SweepGradient(450,lineHeight,GRADIENT_COLORS,GRADIENT_POSITONS);paint.setShader(shader[4]);canvas.drawCircle(450,lineHeight,50,paint);
4.RadialGradient: 光束渲染
RadialGradient:創建從中心向四周發散的輻射漸變效果,
構造函數:
RadialGradient(float centerX, float centerY, float radius, int centerColor, int edgeColor, Shader.TileMode tileMode)
參數:
centerX 圓心的X坐標
centerY 圓心的Y坐標
radius 圓的半徑
centerColor 中心顏色
edgeColor 邊緣顏色
構造函數:
RadialGradient(float centerX, float centerY, float radius, int[] colors, float[] stops, Shader.TileMode tileMode)
參數:
colors[]傳入多個顏色值進去,這樣就會用colors數組中指定的顏色值一起進行顏色線性插值。
stops數組,該數組中每一個stop對應colors數組中每個顏色在半徑中的相對位置,
stop[]取值范圍為[0,1],0表示圓心位置,1表示圓周位置。如果stops數組為null,那么Android會自動為colors設置等間距的位置。
private float period = 0; //偏移量變化周期值
lineHeight += lineOffset + 150;shader[5] = new RadialGradient(150,lineHeight,10,Color.GREEN,Color.RED,Shader.TileMode.MIRROR);paint.setShader(shader[5]);canvas.drawCircle(150,lineHeight,100,paint);if ( period < 250 || period >= 650){ period = 250;}else { period += 5F;}shader[6] = new RadialGradient(period,lineHeight,30,GRADIENT_COLORS,null,Shader.TileMode.MIRROR);paint.setShader(shader[6]);canvas.drawCircle(450,lineHeight,100,paint);
這里多指定了一個period,設置為漸變的圓心x軸坐標,這樣就可以實現滾動的小球

同樣也可以設置繪制的圓心跟隨滾動:將圓心Y軸坐標設置為period,實現小球從上往下掉的效果
canvas.drawCircle(450,period,100,paint);
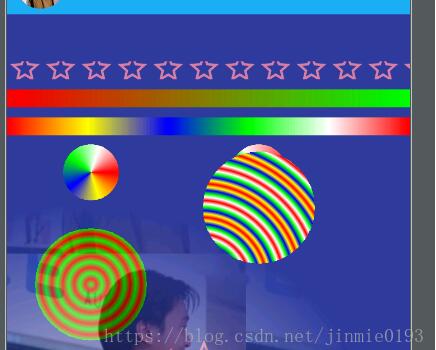
5.ComposeShader: 組合渲染
ComposeShader用來組合不同的Shader,可以將兩個不同的Shader組合在一起
構造函數:
ComposeShader (Shader shaderA, Shader shaderB, Xfermode mode)
ComposeShader (Shader shaderA, Shader shaderB, PorterDuff.Mode mode)
參數:
shaderA shaderB 兩種渲染效果
mode 疊加效果:PorterDuff圖形混合模式介紹
將bitmapShader和RadialGradient模式復合
lineHeight += lineOffset + 350;bitmap = BitmapFactory.decodeResource(getResources(),R.mipmap.head);shader[0] = new BitmapShader(bitmap, Shader.TileMode.REPEAT,Shader.TileMode.REPEAT);shader[6] = new RadialGradient(150,lineHeight,550,Color.BLACK,Color.TRANSPARENT, Shader.TileMode.CLAMP);//混合產生新的Shader.shader[7] = new ComposeShader(shader[0],shader[6],PorterDuff.Mode.DST_IN);paint.setShader(shader[7]);//以新的Shader繪制一個圓。canvas.drawCircle(150,lineHeight,550,paint);
左下角的漸漸模糊的圖片便是組合效果
全部代碼:
//shader 畫筆填充private void my_shader(Canvas canvas){ //Shader.TileMode是指平鋪模式 //Shader.TileMode.CLAMP是邊緣拉伸模式,它會拉伸邊緣的一個像素來填充其他區域。 //Shader.TileMode.MIRROR是鏡像模式,通過鏡像變化來填充其他區域。需要注意的是,鏡像模式先進行y軸方向的鏡像操作,然后在進行x軸方向上的鏡像操作。 //Shader.TileMode.REPEAT是重復模式,通過復制來填充其他區域 //bitmap = BitmapFactory.decodeResource(getResources(),R.mipmap.head); Shader shader[] = new Shader[8]; bitmap = BitmapFactory.decodeResource(getResources(),R.drawable.star); shader[0] = new BitmapShader(bitmap,Shader.TileMode.REPEAT,Shader.TileMode.REPEAT); Paint paint = new Paint(); paint.setStyle(Paint.Style.FILL); paint.setStrokeWidth(32); paint.setShader(shader[0]); int lineHeight = 100,lineOffset = 50; canvas.drawLine(0,lineHeight,parentWidth,100,paint); //canvas.drawCircle(240,240,100,paint); //LinearGradient是顏色線性漸變的著色器。 //LinearGradient (float x0, float y0, float x1, float y1, int color0, int color1, Shader.TileMode tile) //(x0,y0)表示漸變的起點,(x1,y1)表示漸變的終點坐標,這兩點都是相對于屏幕坐標系。color0,color1分別表示起點的顏色和終點的顏色。 //LinearGradient (float x0, float y0, float x1, float y1, int[] colors, float[] positions, Shader.TileMode tile) //多色漸變的構造函數中,我們可以傳入多個顏色,和每個顏色的占比。而且當positions參數傳入null時,代表顏色是均勻的填充整個漸變區域的,顯得比較柔和。 lineHeight += lineOffset; shader[1] = new LinearGradient(0,lineHeight,parentWidth,lineHeight,Color.RED,Color.GREEN,Shader.TileMode.REPEAT); paint.setShader(shader[1]); canvas.drawLine(0,lineHeight,parentWidth,lineHeight,paint); lineHeight += lineOffset; shader[2] = new LinearGradient(0,lineHeight,parentWidth,lineHeight,GRADIENT_COLORS,null,Shader.TileMode.REPEAT); paint.setShader(shader[2]); canvas.drawLine(0,lineHeight,parentWidth,lineHeight,paint); //SweepGradient是梯度漸變,也稱為掃描式漸變,效果有點類似與雷達掃描效果。 //SweepGradient(float cx, float cy, int color0, int color1) // (cx,cy)表示漸變效果的中心點,也就是雷達掃描的圓點。color0和color1表示漸變的起點色和終點色。 // 顏色漸變是順時針的,從中心點的x軸正方形開始。 // 注意:這里構造函數并不需要TileMode,因為梯度漸變的邊界相當于無限大的。 //SweepGradient(float cx, float cy,int colors[], float positions[]) //colors[]顏色數組 //positions數組,該數組中每一個position對應colors數組中每個顏色在360度中的相對位置, // position取值范圍為[0,1],0和1都表示3點鐘位置,0.25表示6點鐘位置,0.5表示9點鐘位置,0.75表示12點鐘位置, lineHeight += lineOffset +32; shader[3] = new SweepGradient(150,lineHeight,GRADIENT_COLORS,null); paint.setShader(shader[3]); canvas.drawCircle(150,lineHeight,50,paint); shader[4] = new SweepGradient(450,lineHeight,GRADIENT_COLORS,GRADIENT_POSITONS); paint.setShader(shader[4]); canvas.drawCircle(450,lineHeight,50,paint); //RadialGradient:創建從中心向四周發散的輻射漸變效果,其有兩個構造函數: //RadialGradient(float centerX, float centerY, float radius, int centerColor, int edgeColor, Shader.TileMode tileMode) //centerX 圓心的X坐標 //centerY 圓心的Y坐標 //radius 圓的半徑 //centerColor 中心顏色 //edgeColor 邊緣顏色 //RadialGradient(float centerX, float centerY, float radius, int[] colors, float[] stops, Shader.TileMode tileMode) //colors[]傳入多個顏色值進去,這樣就會用colors數組中指定的顏色值一起進行顏色線性插值。 // stops數組,該數組中每一個stop對應colors數組中每個顏色在半徑中的相對位置, // stop[]取值范圍為[0,1],0表示圓心位置,1表示圓周位置。如果stops數組為null,那么Android會自動為colors設置等間距的位置。 lineHeight += lineOffset + 150; shader[5] = new RadialGradient(150,lineHeight,10,Color.GREEN,Color.RED,Shader.TileMode.MIRROR); paint.setShader(shader[5]); canvas.drawCircle(150,lineHeight,100,paint); if ( period < 250 || period >= 650){ period = 250; }else { period += 5F; } shader[6] = new RadialGradient(period,lineHeight,30,GRADIENT_COLORS,null,Shader.TileMode.MIRROR); paint.setShader(shader[6]); canvas.drawCircle(450,period,100,paint); //ComposeShader用來組合不同的Shader,可以將兩個不同的Shader組合在一起,它有兩個構造函數: //ComposeShader (Shader shaderA, Shader shaderB, Xfermode mode) //ComposeShader (Shader shaderA, Shader shaderB, PorterDuff.Mode mode) lineHeight += lineOffset + 350; bitmap = BitmapFactory.decodeResource(getResources(),R.mipmap.head); shader[0] = new BitmapShader(bitmap, Shader.TileMode.REPEAT,Shader.TileMode.REPEAT); shader[6] = new RadialGradient(150,lineHeight,550,Color.BLACK,Color.TRANSPARENT, Shader.TileMode.CLAMP); //混合產生新的Shader. shader[7] = new ComposeShader(shader[0],shader[6],PorterDuff.Mode.DST_IN); paint.setShader(shader[7]); //以新的Shader繪制一個圓。 canvas.drawCircle(150,lineHeight,550,paint);}
以上這篇Android Shader著色器/渲染器的用法解析就是小編分享給大家的全部內容了,希望能給大家一個參考,也希望大家多多支持好吧啦網。
相關文章:
 網公網安備
網公網安備