Android自定義流式布局的實現示例
在日常的app使用中,我們會在android 的app中看見 熱門標簽等自動換行的流式布局,今天,我們就來看看如何自定義一個類似熱門標簽那樣的流式布局。下面我們就來詳細介紹流式布局的應用特點以及用的的技術點。
1.流式布局的特點以及應用場景特點:當上面一行的空間不夠容納新的TextView時候,才開辟下一行的空間。
原理圖:
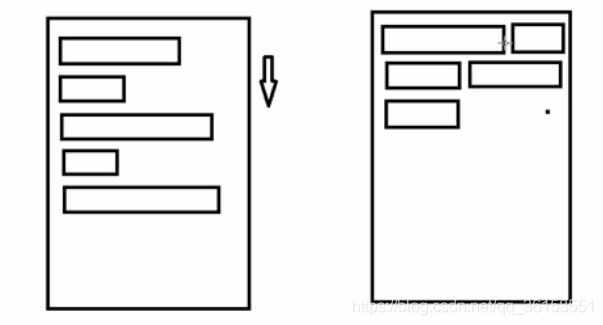
場景:主要用于關鍵詞搜索或者熱門標簽等場景
2.自定義ViewGroup(1)onMeasure:測量子view的寬高,設置自己的寬和高(2)onLayout:設置子view的位置onMeasure:根據子view的布局文件中屬性,來為子view設置測量模式和測量值測量=測量模式+測量值;
測量模式有3種:
EXACTLY:表示設置了精確的值,一般當childView設置其寬、高為精確值、match_parent時,ViewGroup會將其設置為EXACTLY; AT_MOST:表示子布局被限制在一個最大值內,一般當childView設置其寬、高為wrap_content時,ViewGroup會將其設置為AT_MOST; UNSPECIFIED:表示子布局想要多大就多大,一般出現在AadapterView的item的heightMode中、ScrollView的childView的heightMode中;此種模式比較少見。(3)LayoutParams
ViewGroup LayoutParams :每個 ViewGroup 對應一個 LayoutParams; 即 ViewGroup -> LayoutParams getLayoutParams 不知道轉為哪個對應的LayoutParams ,其實很簡單,就是如下: 子View.getLayoutParams 得到的LayoutParams對應的就是 子View所在的父控件的LayoutParams;例如,LinearLayout 里面的子view.getLayoutParams ->LinearLayout.LayoutParams。所以 咱們的FlowLayout 也需要一個LayoutParams,由于上面的效果圖是子View的 margin,所以應該使用MarginLayoutParams。即FlowLayout->MarginLayoutParams
3.代碼FlowLayoutView
/** * Created by zzs on 20/01/16. * 流式布局 */public class FlowLayoutView extends ViewGroup{ public FlowLayoutView(Context context) { super(context); } public FlowLayoutView(Context context, AttributeSet attrs) { super(context, attrs); } //或ViewGroup中所有子元素的屬性 //否則只獲取ViewGroup 的屬性 @Override public LayoutParams generateLayoutParams(AttributeSet attrs) { return new MarginLayoutParams(getContext(),attrs); } /** * 測量控件本身的大小 寬和高 根據子內容獲取 * @param widthMeasureSpec * @param heightMeasureSpec */ @Override protected void onMeasure(int widthMeasureSpec, int heightMeasureSpec) { super.onMeasure(widthMeasureSpec, heightMeasureSpec); //獲取父布局的模式和尺寸 int sizeWidth = MeasureSpec.getSize(widthMeasureSpec); int modeWidth = MeasureSpec.getMode(widthMeasureSpec); int sizeHeight = MeasureSpec.getSize(heightMeasureSpec); int modeHeight = MeasureSpec.getMode(heightMeasureSpec); //記錄Wrap_content的寬高 int width = 0; int height = 0; //沒一行的寬和高 int lineWidth = 0; int lineHeight =0; //獲取子元素的數量 int cCount = getChildCount(); //進行遍歷子元素 for(int i=0;i<cCount;i++){ //獲取每一個子元素 View child = getChildAt(i); //測量每一個子元素 measureChild(child,widthMeasureSpec,heightMeasureSpec); //獲取每個子元素的屬性 MarginLayoutParams layoutParams = (MarginLayoutParams) child.getLayoutParams(); //獲取當前子元素的寬和高 int childWidth = child.getMeasuredWidth()+layoutParams.leftMargin+layoutParams.rightMargin; int childHeight = child.getMeasuredHeight()+layoutParams.bottomMargin+layoutParams.topMargin; if(lineWidth+childWidth>getWidth()-getPaddingLeft()-getPaddingRight()){//換行 width = Math.max(lineWidth,childWidth); lineWidth = childWidth;//重新開一行 當前行的寬度 //疊加之前的高度 height += lineHeight; //重新開一行 這個新行的高度 lineHeight = childHeight; }else{//不換行 //記錄當前行的寬 lineWidth += childWidth; //記錄一行中的高度 lineHeight = Math.max(lineHeight,childHeight); } if(i ==cCount-1){//判斷是否是最后一個元素 width = Math.max(width,lineWidth); height += lineHeight; } //設置ViewGrop最終寬高 setMeasuredDimension(modeWidth==MeasureSpec.EXACTLY?sizeWidth:width+getPaddingRight()+getPaddingLeft(),modeHeight==MeasureSpec.EXACTLY?sizeHeight:height+getPaddingBottom()+getPaddingTop()); } } //記錄所有子元素 按行存取 List<List<View>> mAllViews = new ArrayList<>(); //記錄每一行中最大的高度 private List<Integer> mLineHeight = new ArrayList<>(); //擺放子View ??????????????? @Override protected void onLayout(boolean changed, int l, int t, int r, int b) { //為了多次執行時 數據正確 mAllViews.clear(); mLineHeight.clear(); //獲取父控件的寬度 int width = getWidth(); //記錄一行中的寬和高 int lineWidth = 0; int lineHeight = 0; //記錄一行中的 View List<View> lineView = new ArrayList<>(); //獲取子元素的個數 int cCount = getChildCount(); Log.e('AAA','==AAAA=>'+cCount); //遍歷所有子元素 for(int i=0;i<cCount;i++){ View child = getChildAt(i); //獲取每個子元素的屬性 MarginLayoutParams layoutParams = (MarginLayoutParams) child.getLayoutParams(); //獲取當前子元素的寬和高 int childWidth = child.getMeasuredWidth()+layoutParams.leftMargin+layoutParams.rightMargin; int childHeight = child.getMeasuredHeight()+layoutParams.bottomMargin+layoutParams.topMargin; if(lineWidth+childWidth>width-getPaddingLeft()-getPaddingRight()){//判斷是否換行 //記錄一行的高 和一行中的View mLineHeight.add(lineHeight); mAllViews.add(lineView); Log.e('AAA','==>VVV===>'+mAllViews.size()); //讓數據重置 lineWidth = 0; lineView = new ArrayList<>(); }else{ //記錄一行中的寬 高 view lineWidth += childWidth; lineHeight = Math.max(lineHeight,childHeight); lineView.add(child); } }//處理元素 數據以每行的形式處理 mLineHeight.add(lineHeight); mAllViews.add(lineView); //獲取每個View的padding int left = getPaddingLeft(); int top = getPaddingTop(); //獲取有多少行 int lineNum = mAllViews.size(); Log.e('AAA','=BBB=>'+lineNum); //展示每一行 for(int i=0;i<lineNum;i++){ lineHeight = mLineHeight.get(i); lineView = mAllViews.get(i); //遍歷每一行 // 取出 每一行的 所有的View lineView = mAllViews.get(i); lineHeight = mLineHeight.get(i); // 循環遍歷 每一行的View for(int j=0;j<lineView.size();j++){ View child = lineView.get(j); MarginLayoutParams lp = (MarginLayoutParams) child.getLayoutParams(); int lc = left+lp.leftMargin; int tc = top+lp.topMargin; int rc = lc+child.getMeasuredWidth(); int bc = tc+child.getMeasuredHeight(); //擺放 子View的位置 child.layout(lc, tc, rc, bc); //疊加 前一個View 的 實際寬度 left += child.getMeasuredWidth()+lp.leftMargin+lp.rightMargin; } //換行了 重置 left = getPaddingLeft(); top+=lineHeight; } }}
MainActivity
public class MainActivity extends AppCompatActivity { private FlowLayoutView flowLayoutView; private String[] titils = {'sds', 'da', 'aa', 'fff', 'gggggg', 'hhgghg', 'jjhhhh', 'aaaaaaaaaaaaaaaaaaaaaaaaaaa', 'fff', 'gggggg', 'hhgghg', 'jjhhhh', 'sds', 'da', 'aa', 'fff', 'gggggg', 'sds', 'da', 'aa', 'fff', 'gggggg'}; @Override protected void onCreate(Bundle savedInstanceState) { super.onCreate(savedInstanceState); setContentView(R.layout.activity_main); flowLayoutView = findViewById(R.id.flowLayoutView); for (int i = 0; i < titils.length; i++) { TextView tv = (TextView) LayoutInflater.from(MainActivity.this) .inflate(R.layout.lv_item, flowLayoutView, false); tv.setText(titils[i]); flowLayoutView.addView(tv); } }}
activity_main
<?xml version='1.0' encoding='utf-8'?><LinearLayout xmlns:android='http://schemas.android.com/apk/res/android' xmlns:app='http://schemas.android.com/apk/res-auto' xmlns:tools='http://schemas.android.com/tools' android:layout_width='match_parent' android:layout_height='match_parent' android:orientation='vertical' tools:context='.MainActivity'> <com.zzs.polygon.FlowLayoutView android: android:layout_width='match_parent' android:layout_height='wrap_content' /></LinearLayout>
lv_item
<?xml version='1.0' encoding='utf-8'?><TextView xmlns:android='http://schemas.android.com/apk/res/android' android:layout_width='wrap_content' android:layout_height='wrap_content' android:background='@drawable/tv_shape' android:paddingLeft='10dp' android:paddingTop='5dp' android:paddingRight='10dp' android:paddingBottom='5dp' android:layout_marginLeft='10dp' android:layout_marginBottom='5dp' android:layout_marginRight='10dp' android:layout_marginTop='5dp' android:text='AAA' android:textColor='#ff0000'></TextView>
drawable / tv_shape.xml
<?xml version='1.0' encoding='utf-8'?><shape xmlns:android='http://schemas.android.com/apk/res/android'> <corners android:radius='30dp'></corners> <solid android:color='#8800ff00'></solid> <padding android:left='10dp' android:right='10dp' android:top='10dp' android:bottom='10dp' ></padding></shape></TextView>
效果圖

到此這篇關于Android自定義流式布局的實現示例的文章就介紹到這了,更多相關Android 自定義流式布局內容請搜索好吧啦網以前的文章或繼續瀏覽下面的相關文章希望大家以后多多支持好吧啦網!
相關文章:
 網公網安備
網公網安備