ASP.NET MVC使用Identity增刪改查用戶
源碼在這里:https://github.com/darrenji/UseIdentityCRUDUserInMVC,本地下載
在VS2013中創建一個MVC項目,用默認的"無身份驗證"作為身份驗證機制。
通過控制臺下載Bootstrap。
Install-Package -version 3.0.3 bootstrap
下載成功后,在解決方案下的Content和Scripts多了該版本的css和js文件。
把創建項目默認HomeController中的所有Action以及/Views/Home下的所有視圖刪除。
熱熱身
先來做一個簡單練習。
在HomeController中的Index方法中,把一個字典傳遞給視圖。
public class HomeController : Controller {public ActionResult Index(){ Dictionary<string, object> data = new Dictionary<string, object>(); data.Add("placeholder", "placeholder"); return View(data);} }_Layout.cshtml設置如下:
<head><meta http-equiv="Content-Type" content="text/html; charset=utf-8"/> <meta charset="utf-8" /> <meta name="viewport" content="width=device-width, initial-scale=1.0"> <title>ASP.NET Identity實戰</title> <link href="~/Content/bootstrap.min.css" rel="external nofollow" rel="stylesheet" /> <link href="~/Content/bootstrap-theme.min.css" rel="external nofollow" rel="stylesheet" /> <style>.container {padding-top:10px;}.validation-summary-errors{color:red;} </style></head><body> <div>@RenderBody() </div> @Scripts.Render("~/bundles/jquery") @Scripts.Render("~/bundles/bootstrap") @RenderSection("scripts", required: false)</body>Home/Index.cshtml視圖中:
@{ ViewBag.Title = "Index"; Layout = "~/Views/Shared/_Layout.cshtml";}<div> <div>用戶明細</div> <table>@foreach (string key in Model.Keys){ <tr><th>@key</th><td>@Model[key]</td> </tr>} </table></div>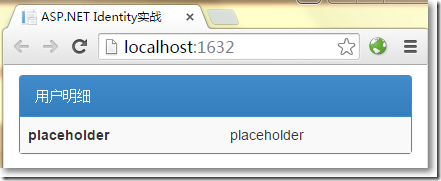
前期準備
分別安裝如下組件。
Install-Package Microsoft.AspNet.Identity.EntityFramework –Version 2.0.0
Install-Package Microsoft.AspNet.Identity.OWIN -Version 2.0.0
Install-Package Microsoft.Owin.Host.SystemWeb -Version 2.1.0
配置Web.config如下:
<?xml version="1.0" encoding="utf-8"?><!-- 有關如何配置 ASP.NET 應用程序的詳細信息,請訪問 http://go.microsoft.com/fwlink/?LinkId=301880 --><configuration> <configSections> <!-- For more information on Entity Framework configuration, visit http://go.microsoft.com/fwlink/?LinkID=237468 --> <section name="entityFramework" type="System.Data.Entity.Internal.ConfigFile.EntityFrameworkSection, EntityFramework, Version=6.0.0.0, Culture=neutral, PublicKeyToken=b77a5c561934e089" requirePermission="false" /> </configSections> <connectionStrings> <add name="IdentityDb" providerName="System.Data.SqlClient" connectionString="Data Source=(localdb)\v11.0;Initial Catalog=IdentityDb;Integrated Security=True;Connect Timeout=15;Encrypt=False;TrustServerCertificate=False;MultipleActiveResultSets=True"/></connectionStrings> <appSettings> <add key="webpages:Version" value="3.0.0.0" /> <add key="webpages:Enabled" value="false" /> <add key="ClientValidationEnabled" value="true" /> <add key="UnobtrusiveJavaScriptEnabled" value="true" /> <add key="owin:AppStartup" value="WebApplication4.IdentityConfig" /> </appSettings> <system.web> <compilation debug="true" targetFramework="4.5" /> <httpRuntime targetFramework="4.5" /> </system.web> <runtime> <assemblyBinding xmlns="urn:schemas-microsoft-com:asm.v1"> <dependentAssembly><assemblyIdentity name="System.Web.Helpers" publicKeyToken="31bf3856ad364e35" /><bindingRedirect oldVersion="1.0.0.0-3.0.0.0" newVersion="3.0.0.0" /> </dependentAssembly> <dependentAssembly><assemblyIdentity name="System.Web.Mvc" publicKeyToken="31bf3856ad364e35" /><bindingRedirect oldVersion="1.0.0.0-5.0.0.0" newVersion="5.0.0.0" /> </dependentAssembly> <dependentAssembly><assemblyIdentity name="System.Web.Optimization" publicKeyToken="31bf3856ad364e35" /><bindingRedirect oldVersion="1.0.0.0-1.1.0.0" newVersion="1.1.0.0" /> </dependentAssembly> <dependentAssembly><assemblyIdentity name="System.Web.WebPages" publicKeyToken="31bf3856ad364e35" /><bindingRedirect oldVersion="1.0.0.0-3.0.0.0" newVersion="3.0.0.0" /> </dependentAssembly> <dependentAssembly><assemblyIdentity name="WebGrease" publicKeyToken="31bf3856ad364e35" /><bindingRedirect oldVersion="0.0.0.0-1.5.2.14234" newVersion="1.5.2.14234" /> </dependentAssembly> </assemblyBinding> </runtime> <entityFramework> <defaultConnectionFactory type="System.Data.Entity.Infrastructure.SqlConnectionFactory, EntityFramework" /> <providers> <provider invariantName="System.Data.SqlClient" type="System.Data.Entity.SqlServer.SqlProviderServices, EntityFramework.SqlServer" /> </providers> </entityFramework></configuration>
以上,
- 增加了connectionStrings節點,將自動創建localdb數據庫
- 在appSettings節點中增加了一個key為owin:AppStartup項,這是確保OWIN運行正常的全局配置
在Models文件夾下創建如下類。
public class AppUser : IdentityUser { }在解決方案下創建Infrastructure文件夾。
在Infrastructure文件夾下創建一個上下文類,需要實現IdentityDbContext<>接口。
public class AppIdentityDbContext : IdentityDbContext<AppUser> {public AppIdentityDbContext() : base("IdentityDb"){}static AppIdentityDbContext(){ //使用EF Code First第一次創建的時候調用 Database.SetInitializer<AppIdentityDbContext>(new IdentityDbInit());}public static AppIdentityDbContext Create(){ return new AppIdentityDbContext();} } //初始化 public class IdentityDbInit : DropCreateDatabaseIfModelChanges<AppIdentityDbContext> {protected override void Seed(AppIdentityDbContext context){ PerformInitialSetup(context); base.Seed(context);}//初始化工作public void PerformInitialSetup(AppIdentityDbContext context){ } }在Infrastructure文件夾下創建一個管理用戶的類,需要繼承UserManager<AppUser>類。
還記得,先前在appSettings節點中配置了一個如下方式:
<add key="owin:AppStartup" value="WebApplication4.IdentityConfig" />
OWIN需要一個全局啟動文件,默認會到項目的頂級命名空間下找IdentityConfig這個類。
那就在App_Start中創建IdentityConfig這個類,這個類在WebApplication4這個命名空間下。
namespace WebApplication4{ public class IdentityConfig {public void Configuration(IAppBuilder app){ app.CreatePerOwinContext<AppIdentityDbContext>(AppIdentityDbContext.Create); app.CreatePerOwinContext<AppUserManager>(AppUserManager.Create); app.UseCookieAuthentication(new CookieAuthenticationOptions { AuthenticationType = DefaultAuthenticationTypes.ApplicationCookie,LoginPath = new Microsoft.Owin.PathString("/Account/Login") });} }}顯示用戶
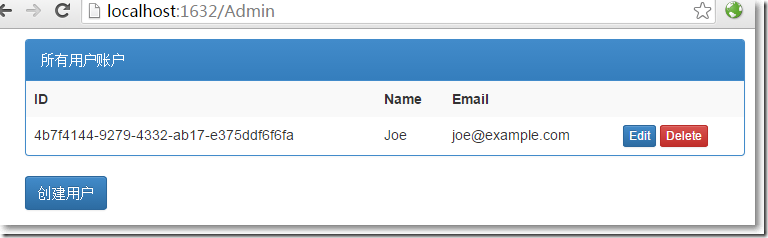
創建AdminController,現在可以向視圖傳遞所有的用戶了,編寫如下:
public class AdminController : Controller {public ActionResult Index(){ return View(UserManager.Users);}private AppUserManager UserManager{ get {return HttpContext.GetOwinContext().GetUserManager<AppUserManager>(); }} }再創建Admin/Index.cshtml類型為IEnumerable<AppUser>的強類型視圖。
@model IEnumerable<WebApplication4.Models.AppUser>@{ ViewBag.Title = "Index"; Layout = "~/Views/Shared/_Layout.cshtml";}<div> <div>所有用戶賬戶 </div> <table><tr><th>ID</th><th>Name</th><th>Email</th><th></th></tr>@if (Model.Count() == 0){ <tr><td colspan="4">還沒有創建用戶</td></tr>}else{ foreach (WebApplication4.Models.AppUser user in Model) {<tr> <td>@user.Id</td> <td>@user.UserName</td> <td>@user.Email</td> <td>@using (Html.BeginForm("Delete", "Admin", new { id = user.Id })){ @Html.ActionLink("編輯", "Edit", new { id = user.Id }, new { @class = "btn btn-primary btn-xs" }) <button type="submit">刪除 </button>} </td></tr> }} </table></div>@Html.ActionLink("創建用戶", "Create", null, new { @class = "btn btn-primary" })
創建用戶
在Models文件夾下創建一個視圖模型。
namespace WebApplication4.Models{ public class CreateModel {public string Id { get; set; }[Required]public string Name { get; set; }[Required]public string Email { get; set; }[Required]public string Password { get; set; } }}在AdminController中添加創建用戶相關的方法。
public class AdminController : Controller {public ActionResult Index(){ return View(UserManager.Users);}//創建顯示public ActionResult Create(){ return View();}[HttpPost]public async Task<ActionResult> Create(CreateModel model){ if(ModelState.IsValid) {var user = new AppUser{UserName = model.Name, Email = model.Email};IdentityResult result = await UserManager.CreateAsync(user, model.Password);if(result.Succeeded){ return RedirectToAction("Index");}else{ AddErrorsFromResult(result);} } return View(model);}//創建接收private void AddErrorsFromResult(IdentityResult result){ foreach(var error in result.Errors) {ModelState.AddModelError("", error); }}private AppUserManager UserManager{ get {return HttpContext.GetOwinContext().GetUserManager<AppUserManager>(); }} }在Admin/Create.cshtml視圖頁中:
@model WebApplication4.Models.CreateModel@{ ViewBag.Title = "Create"; Layout = "~/Views/Shared/_Layout.cshtml";}<h2>Create</h2>@using (Html.BeginForm()) { @Html.AntiForgeryToken() <div><h4>創建用戶</h4><hr />@Html.ValidationSummary(true)<div> @Html.LabelFor(model => model.Name, new { @class = "control-label col-md-2" }) <div>@Html.EditorFor(model => model.Name)@Html.ValidationMessageFor(model => model.Name) </div></div><div> @Html.LabelFor(model => model.Email, new { @class = "control-label col-md-2" }) <div>@Html.EditorFor(model => model.Email)@Html.ValidationMessageFor(model => model.Email) </div></div><div> @Html.LabelFor(model => model.Password, new { @class = "control-label col-md-2" }) <div>@Html.EditorFor(model => model.Password)@Html.ValidationMessageFor(model => model.Password) </div></div><div> <div><input type="submit" value="創建用戶" /> </div></div> </div>}<div> @Html.ActionLink("返回", "Index")</div>
點擊"創建"按鈕,創建成功返回顯示用戶頁面。
oh, my god,只是配置了一下就有數據了? 數據在哪呢?
點擊左上角的"服務器資源管理器",右鍵"IdentityDb",點擊"刷新"。
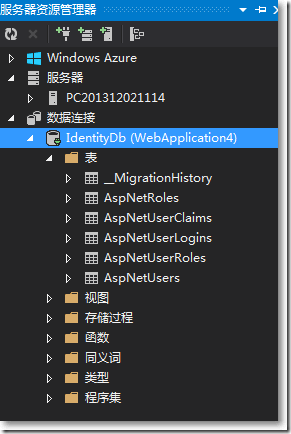
再打開AspNetUsers表,剛創建的用戶赫然在列。

好像還有點欠缺,用戶輸入密碼的時候,總應該有些限制吧。
能想到的,ASP.NET Identity都為我們準備好了。有一個PasswordValidator類就是干這個的。
在Infrastructure文件夾中創建一個PasswordValidator類的繼承子類。
namespace WebApplication4.Infrastructure{ public class CustomPasswordValidator : PasswordValidator {public override async Task<IdentityResult> ValidateAsync(string pass){ IdentityResult result = await base.ValidateAsync(pass); if (pass.Contains("12345")) {var errors = result.Errors.ToList();errors.Add("密碼中包含太多連續數字");result = new IdentityResult(errors); } return result;} }}然后需要把這個規則告訴UserManager。
namespace WebApplication4.Infrastructure{ public class AppUserManager : UserManager<AppUser> {public AppUserManager(IUserStore<AppUser> store) : base(store) { }public static AppUserManager Create(IdentityFactoryOptions<AppUserManager> options, IOwinContext context){ //identity ef上下文 AppIdentityDbContext db = context.Get<AppIdentityDbContext>(); //與identity ef相關的UserStore IUserStore<AppUser> us = new UserStore<AppUser>(db); AppUserManager manager = new AppUserManager(us); //密碼相關 manager.PasswordValidator = new CustomPasswordValidator { RequiredLength = 6,RequireNonLetterOrDigit = false,RequireDigit = false,RequireLowercase = true,RequireUppercase = true }; return manager;} }}再次運行程序,創建用戶頁面,嘗試輸入不通過的密碼。

不過,關于密碼的規則,似乎可以在View Model的驗證層面就可以解決掉。
編輯和刪除用戶
在AdminController中增加編輯和刪除的部分。
public class AdminController : Controller {public ActionResult Index(){ return View(UserManager.Users);}//創建顯示public ActionResult Create(){ return View();}//創建接收[HttpPost]public async Task<ActionResult> Create(CreateModel model){ if(ModelState.IsValid) {var user = new AppUser{UserName = model.Name, Email = model.Email};IdentityResult result = await UserManager.CreateAsync(user, model.Password);if(result.Succeeded){ return RedirectToAction("Index");}else{ AddErrorsFromResult(result);} } return View(model);}//編輯顯示public async Task<ActionResult> Edit(string id){ AppUser user = await UserManager.FindByIdAsync(id); if(User != null) {CreateModel createModel = new CreateModel();createModel.Id = user.Id;createModel.Email = user.Email;createModel.Name = user.UserName;createModel.Password = user.PasswordHash;return View(createModel); } else {return RedirectToAction("Index"); }}//接收編輯[HttpPost]public async Task<ActionResult> Edit(CreateModel createModel){ if(ModelState.IsValid) {AppUser user = await UserManager.FindByIdAsync(createModel.Id);if (user != null){ //關于郵箱 user.Email = createModel.Email; IdentityResult validEmail = await UserManager.UserValidator.ValidateAsync(user); if (!validEmail.Succeeded) {AddErrorsFromResult(validEmail); } user.UserName = createModel.Name; //關于密碼 IdentityResult validPass = null; if (createModel.Password != string.Empty) {validPass = await UserManager.PasswordValidator.ValidateAsync(createModel.Password);if (validPass.Succeeded){ user.PasswordHash = UserManager.PasswordHasher.HashPassword(createModel.Password);}else{ AddErrorsFromResult(validPass);} } user.Email = createModel.Email; //驗證結果 if ((validEmail.Succeeded && validPass == null) || (validEmail.Succeeded && createModel.Password != string.Empty && validPass.Succeeded)) {IdentityResult result = await UserManager.UpdateAsync(user);if (result.Succeeded){ return RedirectToAction("Index");}else{ AddErrorsFromResult(result);} } else {ModelState.AddModelError("", "無此用戶"); }}return View(createModel); } else {return View(createModel); } }//刪除[HttpPost]public async Task<ActionResult> Delete(string id){ AppUser user = await UserManager.FindByIdAsync(id); if(user != null) {IdentityResult result = await UserManager.DeleteAsync(user);if(result.Succeeded){ return RedirectToAction("Index");}else{ return View("Error", result.Errors);} } else {return View("Error", new string[] { "沒有此用戶" }); }}private void AddErrorsFromResult(IdentityResult result){ foreach(var error in result.Errors) {ModelState.AddModelError("", error); }}private AppUserManager UserManager{ get {return HttpContext.GetOwinContext().GetUserManager<AppUserManager>(); }} }Admin/Edit.cshtml視圖。
@model WebApplication4.Models.CreateModel@{ ViewBag.Title = "Edit"; Layout = "~/Views/Shared/_Layout.cshtml";}<h2>Edit</h2>@using (Html.BeginForm()){ @Html.AntiForgeryToken() <div><hr />@Html.ValidationSummary(true)@Html.HiddenFor(model => model.Id)<div> @Html.LabelFor(model => model.Name, new { @class = "control-label col-md-2" }) <div>@Html.EditorFor(model => model.Name)@Html.ValidationMessageFor(model => model.Name) </div></div><div> @Html.LabelFor(model => model.Email, new { @class = "control-label col-md-2" }) <div>@Html.EditorFor(model => model.Email)@Html.ValidationMessageFor(model => model.Email) </div></div><div> @Html.LabelFor(model => model.Password, new { @class = "control-label col-md-2" }) <div>@Html.EditorFor(model => model.Password)@Html.ValidationMessageFor(model => model.Password) </div></div><div> <div><input type="submit" value="保存" /> </div></div> </div>}<div> @Html.ActionLink("返回", "Index")</div>另外,如果刪除失敗,跳轉到Shared/Error.cshtml視圖頁。
@model IEnumerable<string>@{ ViewBag.Title = "Error";}<div> @switch (Model.Count()) {case 0: @: Something went wrong. Please try again break;case 1:@Model.First(); break;default:@: 發現如下錯誤:<ul> @foreach (string error in Model) {<li>@error</li> }</ul> break; }</div>@Html.ActionLink("確定", "Index", null, new { @class = "btn btn-default" })至此,使用ASP.NET Identy實現對用戶的增刪改查完畢,ASP.NET Identity真的很好很強大!
以上就是這篇文章的全部內容了,希望本文的內容對大家的學習或者工作具有一定的參考學習價值,謝謝大家對的支持。如果你想了解更多相關內容請查看下面相關鏈接
相關文章:
1. ASP.NET MVC使用異步Action的方法2. ASP.NET MVC通過勾選checkbox更改select的內容3. 使用EF Code First搭建簡易ASP.NET MVC網站并允許數據庫遷移4. ASP.NET MVC遍歷驗證ModelState的錯誤信息5. ASP.NET MVC使用Quartz.NET執行定時任務6. ASP.NET MVC解決上傳圖片臟數據的方法7. ASP.NET MVC獲取多級類別組合下的產品8. ASP.NET MVC限制同一個IP地址單位時間間隔內的請求次數9. ASP.NET MVC實現單個圖片上傳、限制圖片格式與大小并在服務端裁剪圖片10. ASP.NET MVC使用Session會話保持表單狀態
 網公網安備
網公網安備