.NET Core Web APi類庫內嵌運行的方法
目錄
- 話題
- 內嵌運行.NET Core Web APi
- 總結
話題
我們知道在.NET Framework中可以嵌入運行Web APi,那么在.NET Core(.NET 6+稱之為.NET)中如何內嵌運行Web Api呢,在實際項目中這種場景非常常見,那么我們本節以.NET 6.0作為演示示例一起來瞅瞅
內嵌運行.NET Core Web APi
接下來我們通過控制臺作為主程序來啟動Web APi,首先我們創建名為EmbedWebApi的控制臺程序,然后創建Embed.WebApi類庫運行Web APi,我們在此Web APi中創建如下接口,并實現相關方法來運行Web APi
public class InitTest : IInitTest{ public void Init() {var builder = WebApplication.CreateBuilder();builder.Services.AddControllers();var app = builder.Build();app.UseRouting();app.UseEndpoints(endpoints => { endpoints.MapDefaultControllerRoute();});app.Run(); }}public interface IInitTest{ void Init();}通過寫接口并在對應方法中運行Web APi主要是達到在控制中調用該接口進行模擬實現,這里需要注意一點的是,因為我們創建的Web APi是類庫,要想使用Web里面的Api等等,直接在項目文件中添加如下一行以表明我們要引用框架,這樣一來框架里面所包含的APi等等版本都一致統一,而不是通過NuGet一一下載,這是錯誤的做法
<ItemGroup> <FrameworkReference Include="Microsoft.AspNetCore.App" /></ItemGroup>
接下來我們在該類庫中按照規范創建Controllers文件夾,并創建測試控制器,如下
using Microsoft.AspNetCore.Mvc;namespace Embed.WebApi.Controllers{ [ApiController] [Route("api/[controller]/[action]")] public class TestController : ControllerBase {[HttpGet]public IActionResult Test(){ return Ok("Hello World");} }}最后我們在控制臺程序中注冊上述接口并調用初始化方法,如下:
internal class Program{ static void Main(string[] args) {var services = new ServiceCollection();services.AddTransient<IInitTest, InitTest>();var serviceProvider = services.BuildServiceProvider();var initTest = serviceProvider.GetRequiredService<IInitTest>();initTest.Init();Console.Read(); }}
蕪湖,我們通過Postman模擬調用測試接口,結果驚呆了,404了~~~

當我們將類庫中的控制器移動到控制臺中,此時請求測試接口并成功返回對世界的問候,這是什么原因呢? 不難猜測可知,默認WebAPi控制器的激活以作為入口的主程序集進行查找激活。雖然這樣看似解決了問題,假設調用嵌入運行的主程序是底層已經封裝好的基礎設施,那么豈不是遭到了代碼入侵,所以我們就想在運行的Web APi類庫里面去激活,此時我們想到將類庫作為Web APi應用程序一部分應用手動加載并激活,在初始化方法里面修改為如下即可請求測試接口成功
public class InitTest : IInitTest{ private static readonly string AssemblyName = typeof(InitTest).Assembly.GetName().Name; public void Init() {var builder = WebApplication.CreateBuilder();builder.Services.AddControllers() .AddApplicationPart(Assembly.Load(new AssemblyName(AssemblyName)));var app = builder.Build();app.UseRouting();app.UseEndpoints(endpoints => { endpoints.MapDefaultControllerRoute();});app.Run(); }}上述直接在運行Web APi類庫中添加控制器激活,這種場景完全限定于底層主入口已封裝好,所以只能采用這種方式,若是主入口我們自己可控制,當然還有另外一種方式,來,我們瞧瞧截取的關鍵性源碼
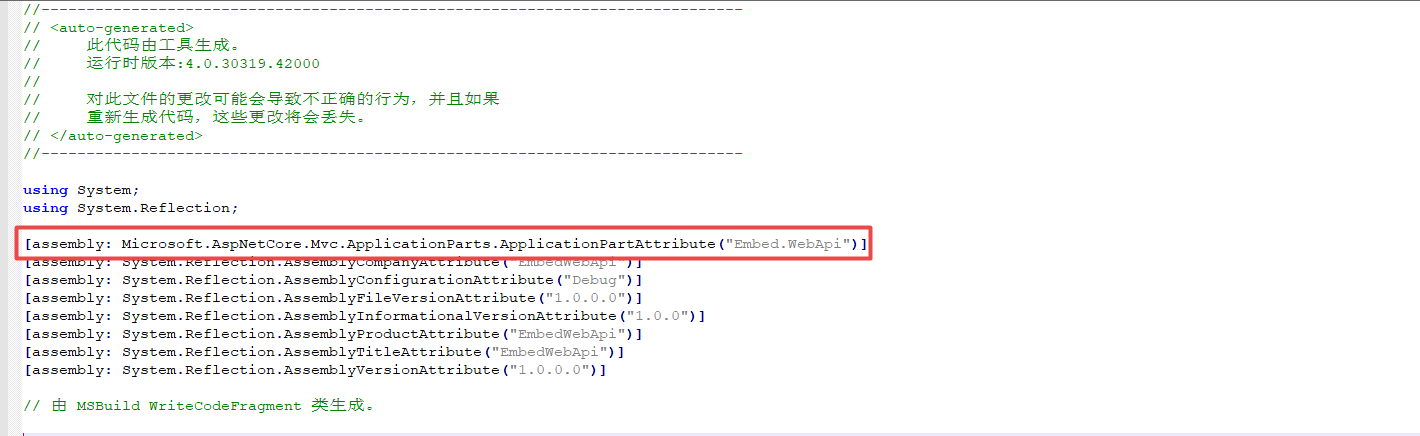
/// <summary>/// Populates the given <paramref name="feature"/> using the list of/// <see cref="IApplicationFeatureProvider{TFeature}"/>s configured on the/// <see cref="ApplicationPartManager"/>./// </summary>/// <typeparam name="TFeature">The type of the feature.</typeparam>/// <param name="feature">The feature instance to populate.</param>public void PopulateFeature<TFeature>(TFeature feature){ if (feature == null) {throw new ArgumentNullException(nameof(feature)); } foreach (var provider in FeatureProviders.OfType<IApplicationFeatureProvider<TFeature>>()) {provider.PopulateFeature(ApplicationParts, feature); }}internal void PopulateDefaultParts(string entryAssemblyName){ var assemblies = GetApplicationPartAssemblies(entryAssemblyName); var seenAssemblies = new HashSet<Assembly>(); foreach (var assembly in assemblies) {if (!seenAssemblies.Add(assembly)){ // "assemblies" may contain duplicate values, but we want unique ApplicationPart instances. // Note that we prefer using a HashSet over Distinct since the latter isn"t // guaranteed to preserve the original ordering. continue;}var partFactory = ApplicationPartFactory.GetApplicationPartFactory(assembly);foreach (var applicationPart in partFactory.GetApplicationParts(assembly)){ ApplicationParts.Add(applicationPart);} }}private static IEnumerable<Assembly> GetApplicationPartAssemblies(string entryAssemblyName){ var entryAssembly = Assembly.Load(new AssemblyName(entryAssemblyName)); // Use ApplicationPartAttribute to get the closure of direct or transitive dependencies // that reference MVC. var assembliesFromAttributes = entryAssembly.GetCustomAttributes<ApplicationPartAttribute>().Select(name => Assembly.Load(name.AssemblyName)).OrderBy(assembly => assembly.FullName, StringComparer.Ordinal).SelectMany(GetAssemblyClosure); // The SDK will not include the entry assembly as an application part. We"ll explicitly list it // and have it appear before all other assemblies \ ApplicationParts. return GetAssemblyClosure(entryAssembly).Concat(assembliesFromAttributes);}private static IEnumerable<Assembly> GetAssemblyClosure(Assembly assembly){ yield return assembly; var relatedAssemblies = RelatedAssemblyAttribute.GetRelatedAssemblies(assembly, throwOnError: false).OrderBy(assembly => assembly.FullName, StringComparer.Ordinal); foreach (var relatedAssembly in relatedAssemblies) {yield return relatedAssembly; }}從上述源碼可知,通過主入口程序集還會加載引用的程序集去查找并激活相關特性(比如控制器),當然前提是實現ApplicationPartAttribute特性,此特性必須在主入口程序集里定義,定義在程序集上,所以我們只需一行代碼即可搞定,我們在控制臺主入口命名空間頂部添加特性,引入Web APi類庫程序集作為應用程序的一部分,如下:
[assembly: ApplicationPart("Embed.WebApi")]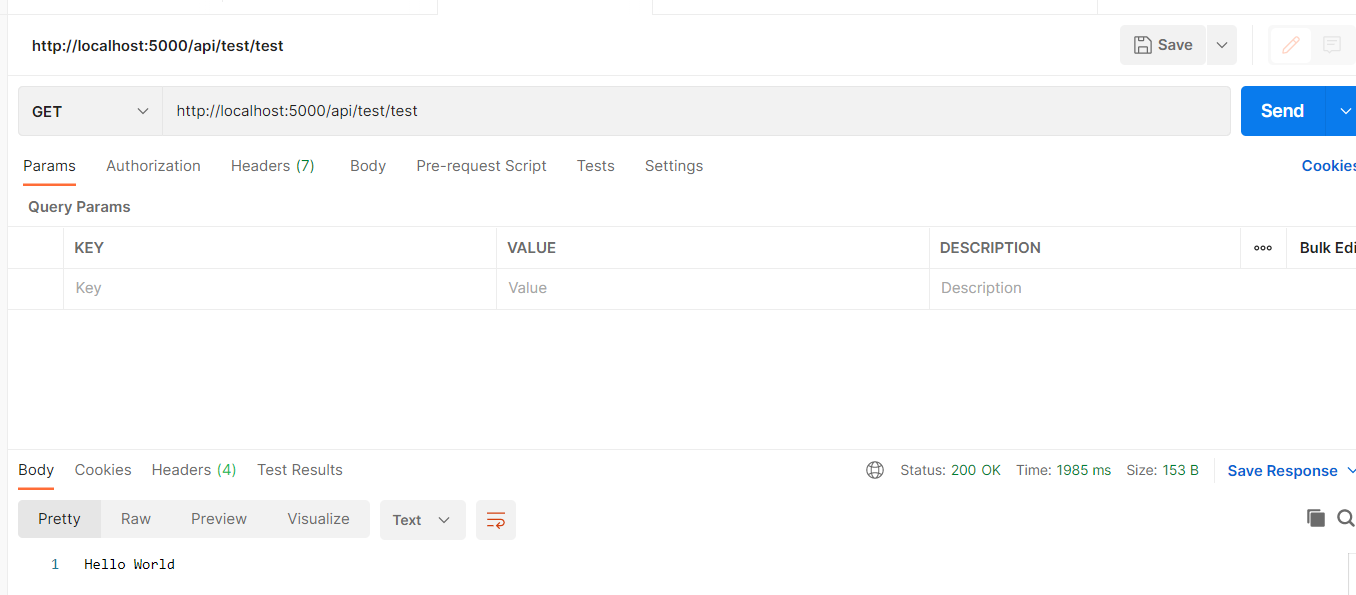
那么接下來問題又來了,要是需要運行多個Web APi我們又當如何呢?按照上述方式一一添加未嘗不可,我們也可以通過MSBuild任務來進行構建將相關特性自動添加到主入口程序集描述信息里面去,例如:
<ItemGroup> <AssemblyAttribute Include="Microsoft.AspNetCore.Mvc.ApplicationParts.ApplicationPartAttribute"><_Parameter1>Embed.WebApi</_Parameter1> </AssemblyAttribute></ItemGroup>
有的童鞋就問了,這不寫死了么,那還不如通過添加特性的方式去處理,請注意這里只是使用示例,實際情況下,我們可將多個Web APi放在同一解決方案下,然后在此解決方案下創建可構建任務的.targets文件,并在主項目文件里引入,將程序集名稱作為變量引入,剩下事情自行統一處理,若不清楚怎么搞,就在代碼中使用特性方式也未嘗不可,例如如下:
<ItemGroup> <AssemblyAttribute Include="Microsoft.AspNetCore.Mvc.ApplicationParts.ApplicationPartAttribute"><_Parameter1>$(AssemblyName)</_Parameter1> </AssemblyAttribute></ItemGroup>
總結
本節我們重點討論如何內嵌運行.NET Core Web APi類庫,同時介紹了兩種激活比如控制器特性方案, 希望對您有所幫助,謝謝,我們下節再會
到此這篇關于.NET Core Web APi類庫內嵌運行的方法的文章就介紹到這了,更多相關.NET Core Web APi內容請搜索以前的文章或繼續瀏覽下面的相關文章希望大家以后多多支持!

 網公網安備
網公網安備