Python+Opencv身份證號碼區域提取及識別實現
前端時間智能信息處理實訓,我選擇的課題為身份證號碼識別,對中華人民共和國公民身份證進行識別,提取并識別其中的身份證號碼,將身份證號碼識別為字符串的形式輸出。現在實訓結束了將代碼發布出來供大家參考,識別的方式并不復雜,并加了一些注釋,如果有什么問題可共同討論。最后重要的事情說三遍:請勿直接抄襲,請勿直接抄襲,請勿直接抄襲!尤其是我的學弟學妹們,還是要自己做的,小心直接拿我的用被老師發現了挨批^_^。
實訓環境:CentOS-7.5.1804 + Python-3.6.6 + Opencv-3.4.1
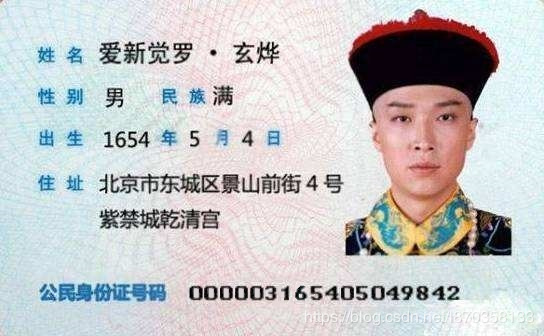
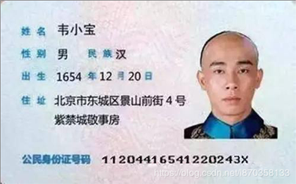
做測試用的照片以及數字識別匹配使用的模板(自制)提供給大家,通過查詢得到,身份證號碼使用的字體格式為OCR-B 10 BT格式,實訓中用到的身份證圖片為訓練測試圖片,有一部分是老師當時直接給出的,還有一部分是我自己用自己身份證做的測試和從網上找到了一張,由于部分身份證號碼不是標準字體格式,對識別造成影響,所以有部分圖片我還提前ps了一下。


流程圖
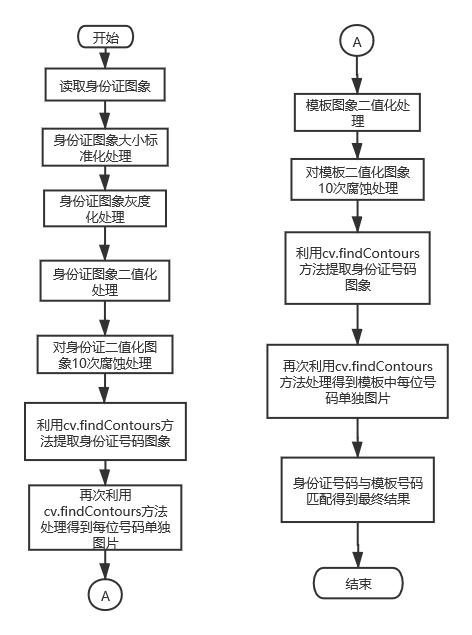
前期處理的部分不在描述,流程圖和代碼注釋中都有。其實整個過程并不是很復雜,本來想過在數字識別方面用現成的一些方法,或者想要嘗試用到卷積神經網絡(CNN)然后做訓練集來識別。后來在和老師交流的時候,老師給出建議可以嘗試使用特征點匹配或者其他類方法。根據最后數字分割出來單獨顯示的效果,想到了一個適合于我代碼情況的簡單方法。
建立一個標準號碼庫(利用上面自制模板數字分割后獲得),然后用每一個號碼圖片與庫中所有標準號碼圖片做相似度匹配,和哪一個模板相似度最高,則說明該圖片為哪一位號碼。在將模板號碼分割成功后,最關鍵的一步就是進行相似度匹配。為提高匹配的精確度和效率,首先利用cv.resize()將前面被提取出的每位身份證號碼以及標準號碼庫中的號碼做圖像大小調整,統一將圖像均調整為12x18像素的大小,圖像大小的選擇是經過慎重的考慮的,如果太大則計算過程耗時,如果過小則可能存在較大誤差。匹配的具體方案為:記錄需要識別的圖片與每個模板圖片中有多少位置的像素點相同,相同的越多,說明相似度越高,也就最有可能是某個號碼。最終將18位號碼都識別完成后,得到的具體的相似度矩陣。
具體代碼如下所示:
import cv2 as cvimport numpy as npimport matplotlib.pyplot as plt# 將身份證號碼區域從身份證中提取出def Extract(op_image, sh_image): binary, contours, hierarchy = cv.findContours(op_image, cv.RETR_TREE, cv.CHAIN_APPROX_SIMPLE) contours.remove(contours[0]) max_x, max_y, max_w, max_h = cv.boundingRect(contours[0]) color = (0, 0, 0) for c in contours: x, y, w, h = cv.boundingRect(c) cv.rectangle(op_image, (x, y), (x + w, y + h), color, 1) cv.rectangle(sh_image, (x, y), (x + w, y + h), color, 1) if max_w < w: max_x = x max_y = y max_w = w max_h = h cut_img = sh_image[max_y:max_y+max_h, max_x:max_x+max_w] cv.imshow('The recognized enlarged image', op_image) cv.waitKey(0) cv.imshow('The recognized binary image', sh_image) cv.waitKey(0) return cut_img# 號碼內部區域填充(未繼續是用此方法)def Area_filling(image, kernel): # The boundary image iterate = np.zeros(image.shape, np.uint8) iterate[:, 0] = image[:, 0] iterate[:, -1] = image[:, -1] iterate[0, :] = image[0, :] iterate[-1, :] = image[-1, :] while True: old_iterate = iterate iterate_dilation = cv.dilate(iterate, kernel, iterations=1) iterate = cv.bitwise_and(iterate_dilation, image) difference = cv.subtract(iterate, old_iterate) # if difference is all zeros it will return False if not np.any(difference): break return iterate# 將身份證號碼區域再次切割使得一張圖片一位號碼def Segmentation(cut_img, kernel, n): #首先進行一次號碼內空白填充(效果不佳,放棄) #area_img = Area_filling(cut_img, kernel) #cv.imshow('area_img', area_img) #cv.waitKey(0) #dilate = cv.dilate(area_img, kernel, iterations=1) #cv.imshow('dilate', dilate) #cv.waitKey(0) cut_copy = cut_img.copy() binary, contours, hierarchy = cv.findContours(cut_copy, cv.RETR_TREE, cv.CHAIN_APPROX_SIMPLE) contours.remove(contours[0]) for c in contours: x, y, w, h = cv.boundingRect(c) for i in range(h): for j in range(w): # 把首次用findContours()方法識別的輪廓內區域置黑色 cut_copy[y + i, x + j] = 0 # cv.rectangle(cut_copy, (x, y), (x + w, y + h), color, 1) cv.imshow('Filled image', cut_copy) cv.waitKey(0) # 嘗試進行分割 binary, contours, hierarchy = cv.findContours(cut_copy, cv.RETR_TREE, cv.CHAIN_APPROX_SIMPLE) #tmp_img = cut_img.copy() # 如果識別的輪廓數量不是n+1位(首先是一個整個區域的輪廓,然后是n位號碼各自的輪廓,身份證和匹配模板分割均用此方法) while len(contours)!=n+1: if len(contours) < n+1: # 如果提取的輪廓數量小于n+1, 說明可能有兩位數被識別到一個輪廓中,做一次閉運算,消除數位之間可能存在的連接部分,然后再次嘗試提取 #cut_copy = cv.dilate(cut_copy, kernel, iterations=1) cut_copy = cv.morphologyEx(cut_copy, cv.MORPH_CLOSE, kernel) cv.imshow('cut_copy', cut_copy) cv.waitKey(0) # 再次嘗試提取身份證區域的輪廓并將輪廓內區域用黑色覆蓋 binary, contours, hierarchy = cv.findContours(cut_copy, cv.RETR_TREE, cv.CHAIN_APPROX_SIMPLE) # 去掉提取出的第一個輪廓(第一個輪廓為整張圖片) contours.remove(contours[0]) for c in contours: x, y, w, h = cv.boundingRect(c) for i in range(h): for j in range(w): cut_copy[y + i, x + j] = 0 # cv.rectangle(cut_copy, (x, y), (x + w, y + h), color, 1) cv.imshow('Filled image', cut_copy) cv.waitKey(0) #如果findContours()結果為n,跳出 if len(contours) == n: break elif len(contours) > n+1: # 如果提取的輪廓數量大于n+1, 說明可能有一位數被識別到兩個輪廓中,做一次開運算,增強附近身份證區域部分之間的連接部分,然后再次嘗試提取 #cut_copy = cv.erode(cut_copy, kernel, iterations=1) cut_copy = cv.morphologyEx(cut_copy, cv.MORPH_OPEN, kernel2) cv.imshow('cut_copy', cut_copy) cv.waitKey(0) #再次嘗試提取身份證區域的輪廓并將輪廓內區域用黑色覆蓋 binary, contours, hierarchy = cv.findContours(cut_copy, cv.RETR_TREE, cv.CHAIN_APPROX_SIMPLE) #去掉提取出的第一個輪廓(第一個輪廓為整張圖片) contours.remove(contours[0]) for c in contours: x, y, w, h = cv.boundingRect(c) for i in range(h): for j in range(w): cut_copy[y + i, x + j] = 0 # cv.rectangle(cut_copy, (x, y), (x + w, y + h), color, 1) #cv.imshow('cut_copy', cut_copy) #cv.waitKey(0) if len(contours) == n: break # 上述while()中循環完成后,處理的圖像基本滿足分割要求,進行最后的提取分割 binary, contours, hierarchy = cv.findContours(cut_copy, cv.RETR_TREE, cv.CHAIN_APPROX_SIMPLE) contours.remove(contours[0]) color = (0, 0, 0) for c in contours: x, y, w, h = cv.boundingRect(c) for i in range(h): for j in range(w): cv.rectangle(cut_copy, (x, y), (x + w, y + h), color, 1) cv.rectangle(cut_img, (x, y), (x + w, y + h), color, 1) cv.imshow('Filled image', cut_copy) cv.waitKey(0) cv.imshow('cut_img', cut_img) cv.waitKey(0) #print(’number:’, len(contours)) # Returns the result of the split return contours #return cut_img# Sort排序方法,先將圖像分割,由于分割的先后順序不是按照從左往右,根據橫坐標大小將每位身份證號碼圖片進行排序def sort(contours, image): tmp_num = [] x_all = [] x_sort = [] for c in contours: x, y, w, h = cv.boundingRect(c) # 使用x坐標來確定身份證號碼圖片的順序,把個圖片坐標的x值放入x_sort中 x_sort.append(x) # 建立一個用于索引x坐標的列表 x_all.append(x) tmp_img = image[y+1:y+h-1, x+1:x+w-1] tmp_img = cv.resize(tmp_img, (40, 60)) cv.imshow('Number', tmp_img) cv.waitKey(0) # 將分割的圖片縮小至12乘18像素的大小,標準化同時節約模板匹配的時間 tmp_img = cv.resize(tmp_img, (12, 18)) tmp_num.append(tmp_img) # 利用x_sort排序,用x_all索引,對身份證號碼圖片排序 x_sort.sort() num_img = [] for x in x_sort: index = x_all.index(x) num_img.append(tmp_num[index]) # 返回排序后圖片列表 return num_img# 圖像識別方法def MatchImage(img_num, tplt_num): # IDnum用于存儲最終的身份證字符串 IDnum = ’’ # 身份證號碼18位 for i in range(18): # 存儲最大相似度模板的索引以及最大相似度 max_index = 0 max_simil = 0 # 模板有1~9,0,X共11個 for j in range(11): # 存儲身份證號碼圖片與模板之間的相似度 simil = 0 for y in range(18): for x in range(12): # 如果身份證號碼圖片與模板之間對應位置像素點相同,simil 值自加1 if img_num[i][y,x] == tplt_num[j][y,x]: simil+=1 if max_simil < simil: max_index = j max_simil = simil print(str(simil)+’ ’,end=’’) if max_index < 9: IDnum += str(max_index+1) elif max_index == 9: IDnum += str(0) else: IDnum += ’X’ print() return IDnum# 最終效果展示def display(IDnum, image): image = cv.resize(image, (960, 90)) plt.figure(num=’ID_Number’) plt.subplot(111), plt.imshow(image, cmap=’gray’), plt.title(IDnum, fontsize=30), plt.xticks([]), plt.yticks([]) plt.show()if __name__ == ’__main__’: # 一共三張做測試用身份證圖像 path = ’IDcard01.jpg’ #path = ’IDcard02.png’ #path = ’IDcard.jpg’ id_card = cv.imread(path, 0) cv.imshow(’Original image’, id_card) cv.waitKey(0) # 將圖像轉化成標準大小 id_card = cv.resize(id_card,(1200, 820)) cv.imshow(’Enlarged original image’, id_card) cv.waitKey(0) # 圖像二值化 ret, binary_img = cv.threshold(id_card, 127, 255, cv.THRESH_BINARY) cv.imshow(’Binary image’, binary_img) cv.waitKey(0) # RECTANGULAR kernel = cv.getStructuringElement(cv.MORPH_RECT, (3, 3)) # RECTANGULAR kernel2 = cv.getStructuringElement(cv.MORPH_DILATE, (5, 5)) #close_img = cv.morphologyEx(binary_img, cv.MORPH_CLOSE, kernel) # The corrosion treatment connects the ID Numbers erode = cv.erode(binary_img, kernel, iterations=10) cv.imshow(’Eroded image’, erode) cv.waitKey(0) cut_img = Extract(erode, binary_img.copy()) cv.imshow('cut_img', cut_img) cv.waitKey(0) # 存儲最終分割的輪廓 contours = Segmentation(cut_img, kernel, 18) # 對圖像進行分割并排序 img_num = sort(contours, cut_img) # 識別用的模板 tplt_path = ’/home/image/Pictures/template.jpg’ tplt_img = cv.imread(tplt_path, 0) #cv.imshow(’Template image’, tplt_img) #cv.waitKey(0) ret, binary_tplt = cv.threshold(tplt_img, 127, 255, cv.THRESH_BINARY) cv.imshow(’Binary template image’, binary_tplt) cv.waitKey(0) # 與身份證相同的分割方式 contours = Segmentation(binary_tplt, kernel, 11) tplt_num = sort(contours, binary_tplt) # 最終識別出的身份證號碼 IDnum = MatchImage(img_num, tplt_num) print(’nID_Number is:’, IDnum) # 圖片展示 display(IDnum, cut_img)
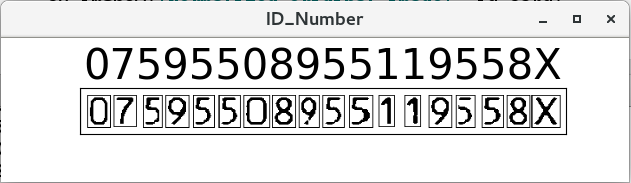
效果展示:
到此這篇關于Python+Opencv身份證號碼區域提取及識別實現的文章就介紹到這了,更多相關Python+Opencv身份證號碼區域提取及識別內容請搜索好吧啦網以前的文章或繼續瀏覽下面的相關文章希望大家以后多多支持好吧啦網!
相關文章:

 網公網安備
網公網安備